

WooCommerce spam orders happen when bots or fraudsters place fake orders. These orders clutter your WordPress store’s database, waste your time, and even lead to financial losses from chargebacks. Unlike user registration spam, these spam orders directly impact your sales and operations.
This problem often stems from weak security settings, like open guest checkout, lack of bot protection, and poor validation.
Since WooCommerce doesn’t include built-in tools to prevent spam orders, you’ll need to take extra steps to block them. Let’s get straight into the best ways to stop it.
1. Set up Cloudflare: your first line of defense
When it comes to stopping WooCommerce order spam, Cloudflare is your most effective tool because it can help stop spam before it reaches your site.
While other solutions, such as CAPTCHA, anti-spam plugins, and fraud prevention tools, work by filtering spam after bots interact with your store, Cloudflare blocks bad traffic at the edge, preventing bots from reaching your checkout and registration pages.
Cloudflare is more than just a Content Delivery Network (CDN); it’s a security powerhouse. It provides Bot Fight Mode, Web Application Firewall (WAF) rules, and IP blocking, all of which reduce the load on your store, protect your resources, and keep fraudulent orders from slipping through.
Why set up a personal Cloudflare account if Kinsta already includes Cloudflare?
While writing this article, we asked Kinsta’s support engineers this very question. Their response? Kinsta’s Cloudflare integration provides strong, enterprise-level security, but setting up your own Cloudflare account gives you more control.
Kinsta’s built-in Web Application Firewall (WAF) and bot protection apply platform-wide security rules designed to protect all sites hosted with us. However, a personal Cloudflare account lets you fine-tune security settings for your specific WooCommerce store.
Our support team often recommends that customers set up their own Cloudflare account in front of Kinsta’s. This allows you to:
- Create custom WAF rules to challenge suspicious visitors on checkout and registration pages.
- Block entire countries or only allow only regions in which your business operates.
- Apply additional bot filtering before traffic even reaches your site container.
That said, even without your own Cloudflare account, Kinsta’s support team can still block specific bots or IPs at the container level when needed. But if you want extra control and proactive protection, configuring Cloudflare yourself is the best approach.
How to set up Cloudflare for WooCommerce spam protection
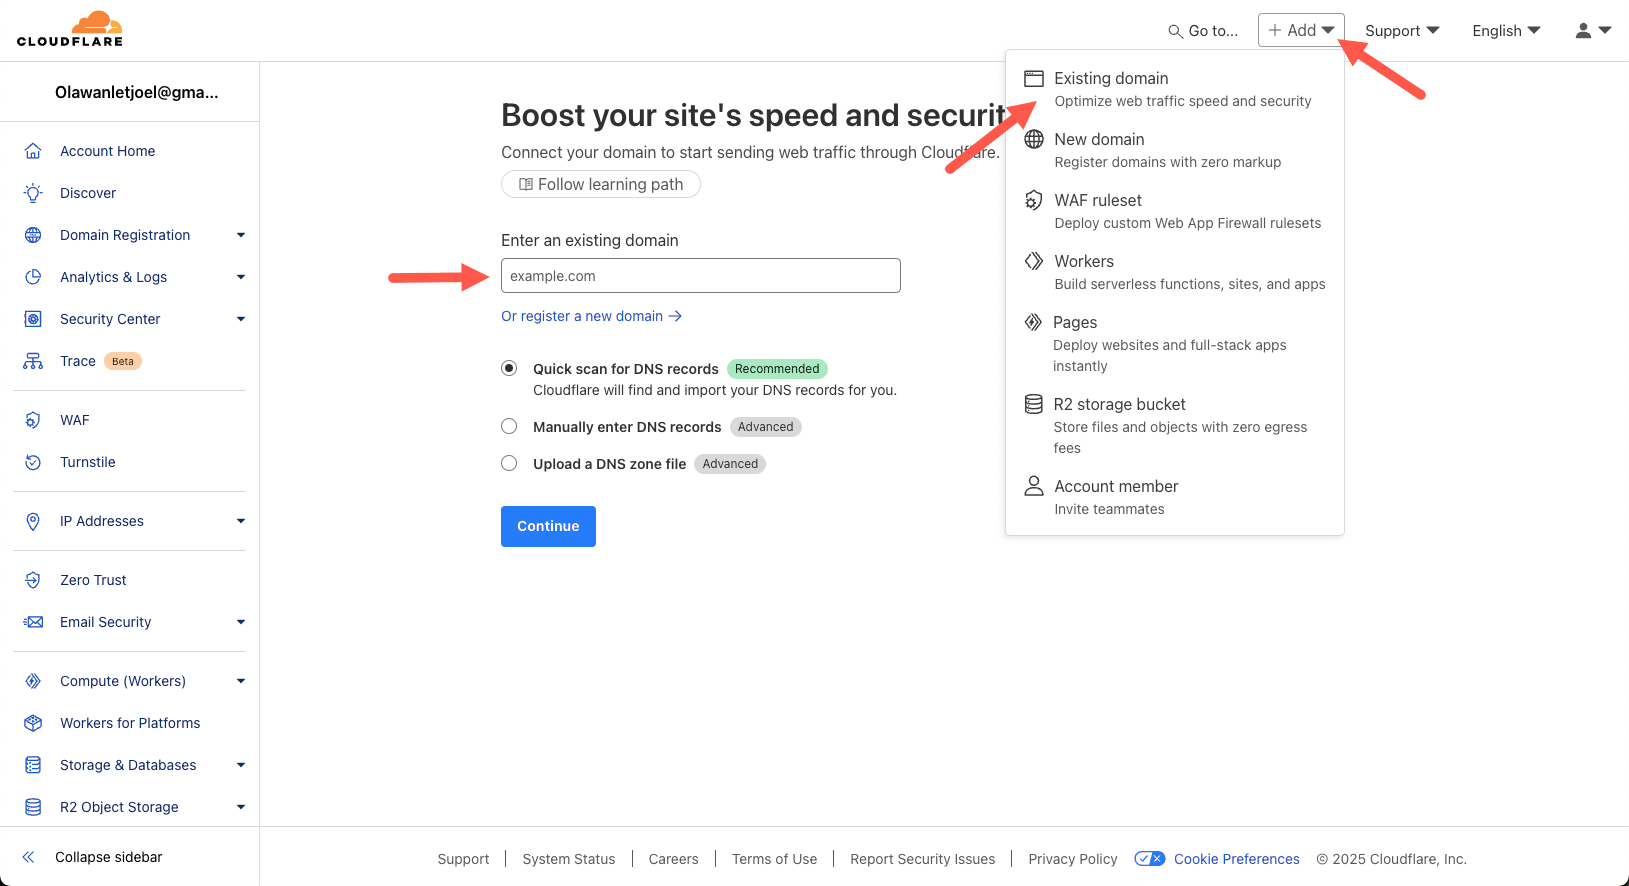
The first step is to sign up for a free Cloudflare account if you don’t already have one. Once signed in, you’ll be taken to the Cloudflare dashboard.
To begin, click on the + Add dropdown, click Existing domain, and then enter the domain of your WooCommerce store. This allows Cloudflare to manage traffic and apply security rules to your site.

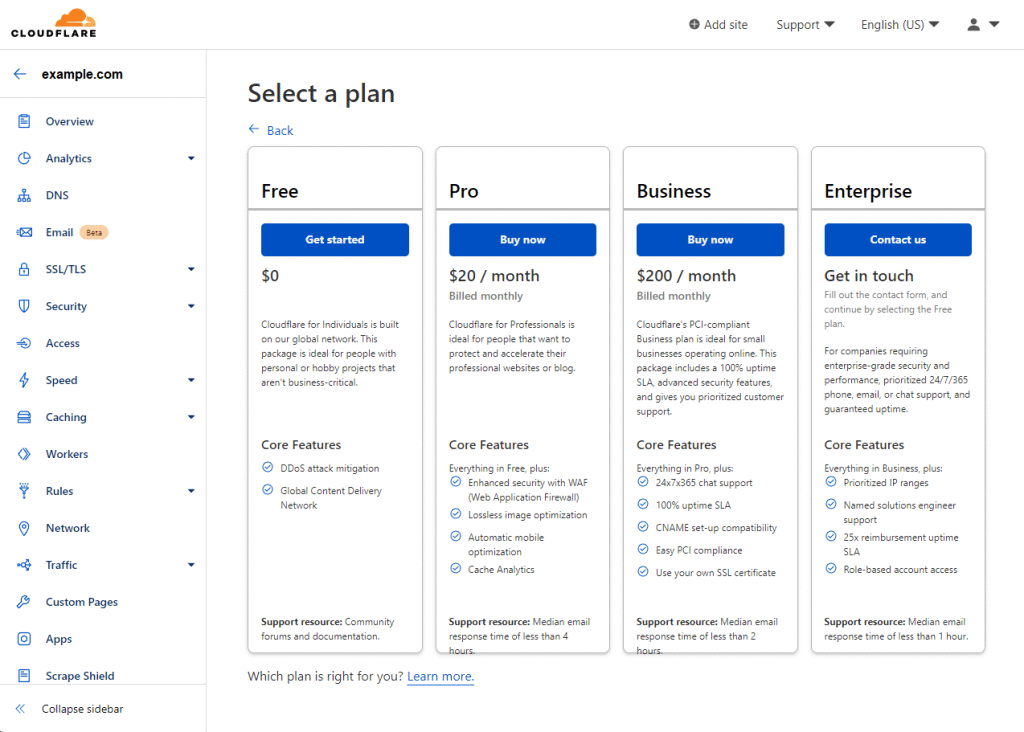
After entering your domain, Cloudflare will ask you to select a plan. The free plan is sufficient for most WooCommerce stores, as it includes Bot Fight Mode, basic DDoS protection, and security rules. Select the Free Plan, then click Continue.
Next, Cloudflare will scan your current DNS records. You’ll see a list of records automatically pulled from your existing hosting provider. Make sure your primary domain and subdomains are correctly listed. Click Continue to proceed.

Cloudflare will now provide you with new nameservers. To activate Cloudflare’s security features, you’ll need to update your domain’s nameservers at your domain registrar.
After updating your nameservers, return to Cloudflare and click Done, Check Nameservers. Cloudflare may take a few minutes to detect the changes. Once your site is active on Cloudflare, you can set up bot protection rules.
Enable Bot Fight Mode to Block Malicious Bots
One of Cloudflare’s built-in security features is Bot Fight Mode, which blocks known bad bots before they can interact with your WooCommerce store.
To enable it, navigate to Security > Bots in your Cloudflare dashboard. Locate Bot Fight Mode and toggle it ON.
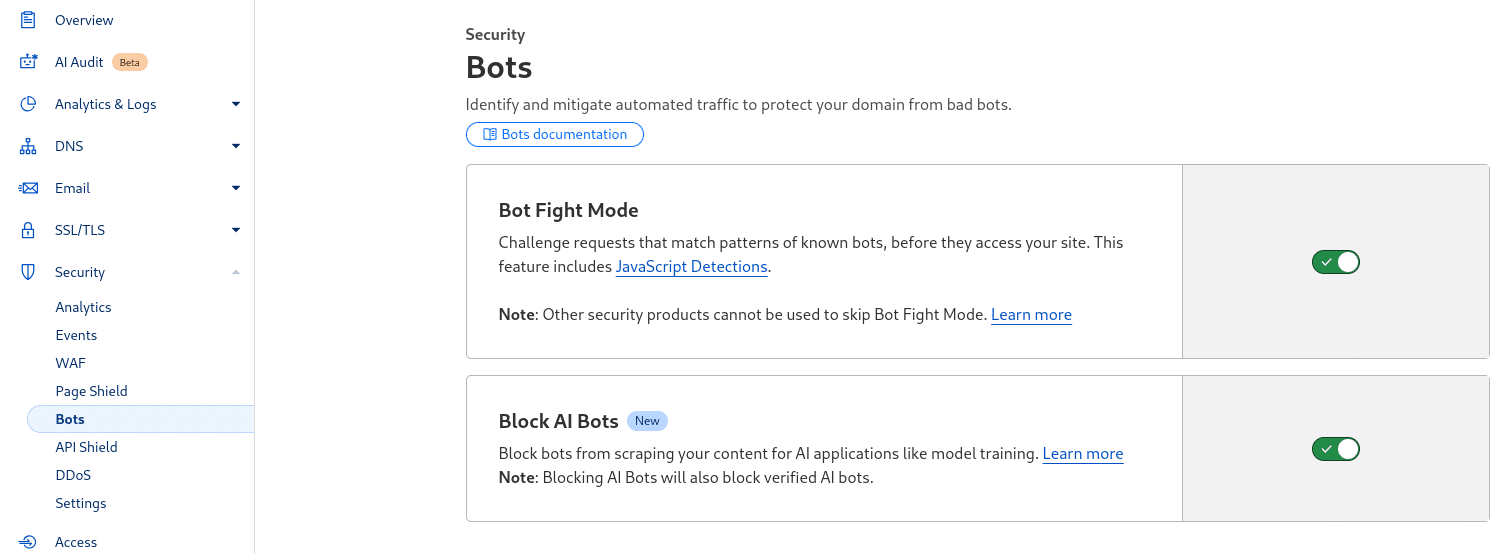
This will immediately help reduce automated spam orders by preventing bots from reaching your checkout and registration pages.
While enabling Bot Fight Mode, it’s also a good idea to turn on Block AI Bots, which is located right next to it. Our support engineers mention that while this setting isn’t strictly needed for WooCommerce spam prevention, it can help with performance spikes caused by AI bots aggressively scraping your site. These bots often send high volumes of uncached requests, which can slow down your site. By enabling Block AI Bots, you reduce spam-related traffic and prevent unnecessary load on your server, keeping your WooCommerce store running smoothly.
Create a custom WAF rule for WooCommerce spam protection
Cloudflare’s WAF lets you set up rules to filter out spam traffic before it reaches your WooCommerce store. Our support engineers shared examples of two useful rules: one that challenges suspicious visitors on key pages and another that blocks traffic from specific countries.
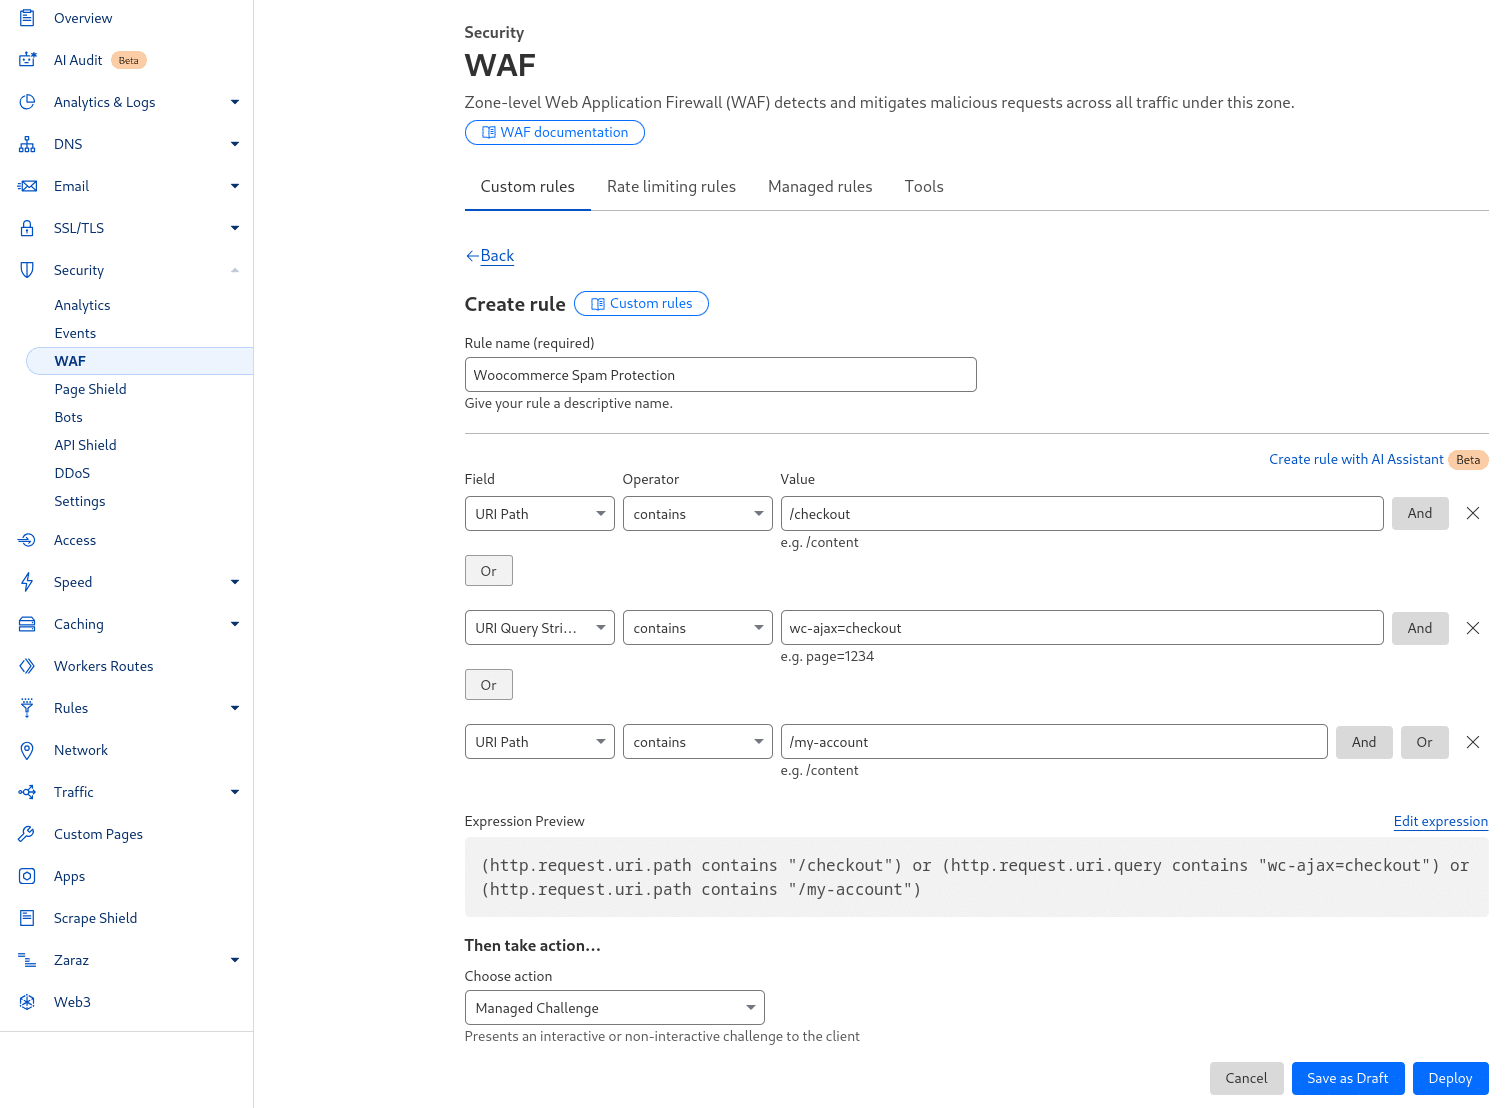
For checkout and registration protection, the rule should target both the URI path and URL query string. In Cloudflare’s Security > WAF, create a rule named WooCommerce Spam Protection. Set the URI Path to contain /checkout/ and /my-account/ while also adding URL Query String contains wc-ajax=checkout. The action should be a Managed Challenge, which forces suspicious users to verify that they are human before proceeding.
For country-based blocking, create a separate rule in Security > WAF and set the Country field to does not equal United States, Canada, and United Kingdom (or any countries supported by your store). Set the action to Block, ensuring that only visitors from approved locations can access your site.
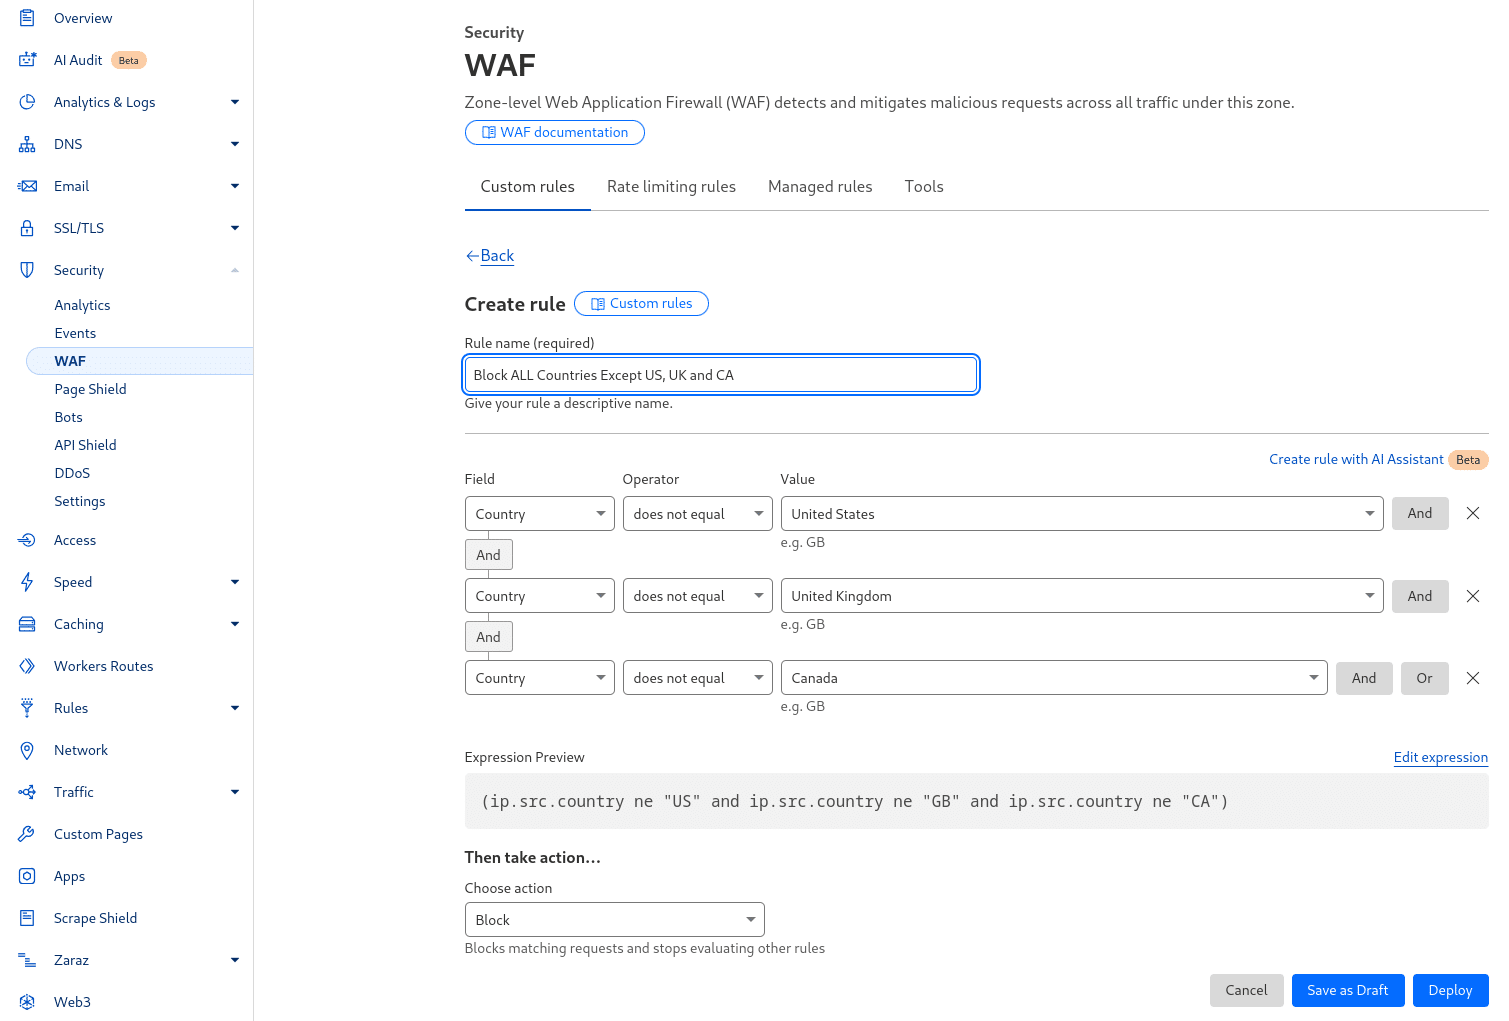
These rules help prevent both automated spam bots and fraudulent orders from high-risk regions while allowing legitimate customers.
Once done, click Deploy Rule. Cloudflare will now challenge suspicious traffic on these pages, blocking automated spam bots while allowing real customers through.
While Cloudflare is the best first line of defense, you may still need additional filtering at the site level. Plugins come in handy when you need to analyze data within WooCommerce itself, such as:
- Checking customer details before blocking an order.
- Filtering out spam registrations based on email domains or IP history.
- Preventing fake orders that slip past bot protection.
Our support engineers recommend using Cloudflare wherever possible to block spam before it reaches the site. However, if Cloudflare alone isn’t enough, or you’d rather handle spam filtering directly in WordPress, here are some other options to help prevent WooCommerce spam orders.
2. Add CAPTCHA to checkout and registration forms
One of the easiest and most effective ways to block spam orders is by adding a CAPTCHA to key forms in your WooCommerce store.
CAPTCHA stands for Completely Automated Public Turing test to tell Computers and Humans Apart. It’s a security measure that helps block bots and spammers from accessing your site. CAPTCHA challenges users with simple tasks like selecting images, checking a box, or typing distorted text that are easy for humans but difficult for bots to solve.
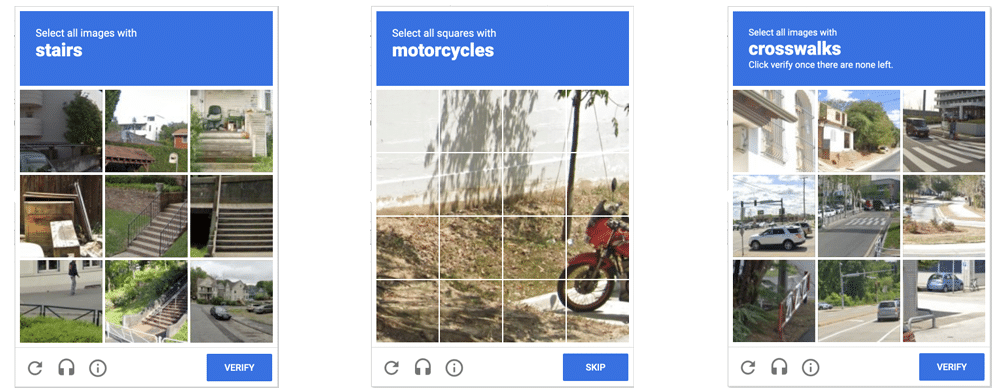
By doing this, CAPTCHA prevents automated bots from submitting fake orders while allowing real customers to complete their purchases without hassle.
To prevent order spam effectively, you should add CAPTCHA to:
- Checkout forms — Stops bots from placing fake orders.
- Registration forms — Prevents spam customer accounts from being created.
- Login forms — Blocks brute-force attacks where bots try to gain access to accounts.
Several plugins make it easy to integrate CAPTCHA into your WooCommerce site, but we recommend using Simple Cloudflare Turnstile or Advanced Google reCAPTCHA. You only need to implement one. Below, we’ll walk you through both options.
Option 1: Using Simple Cloudflare Turnstile
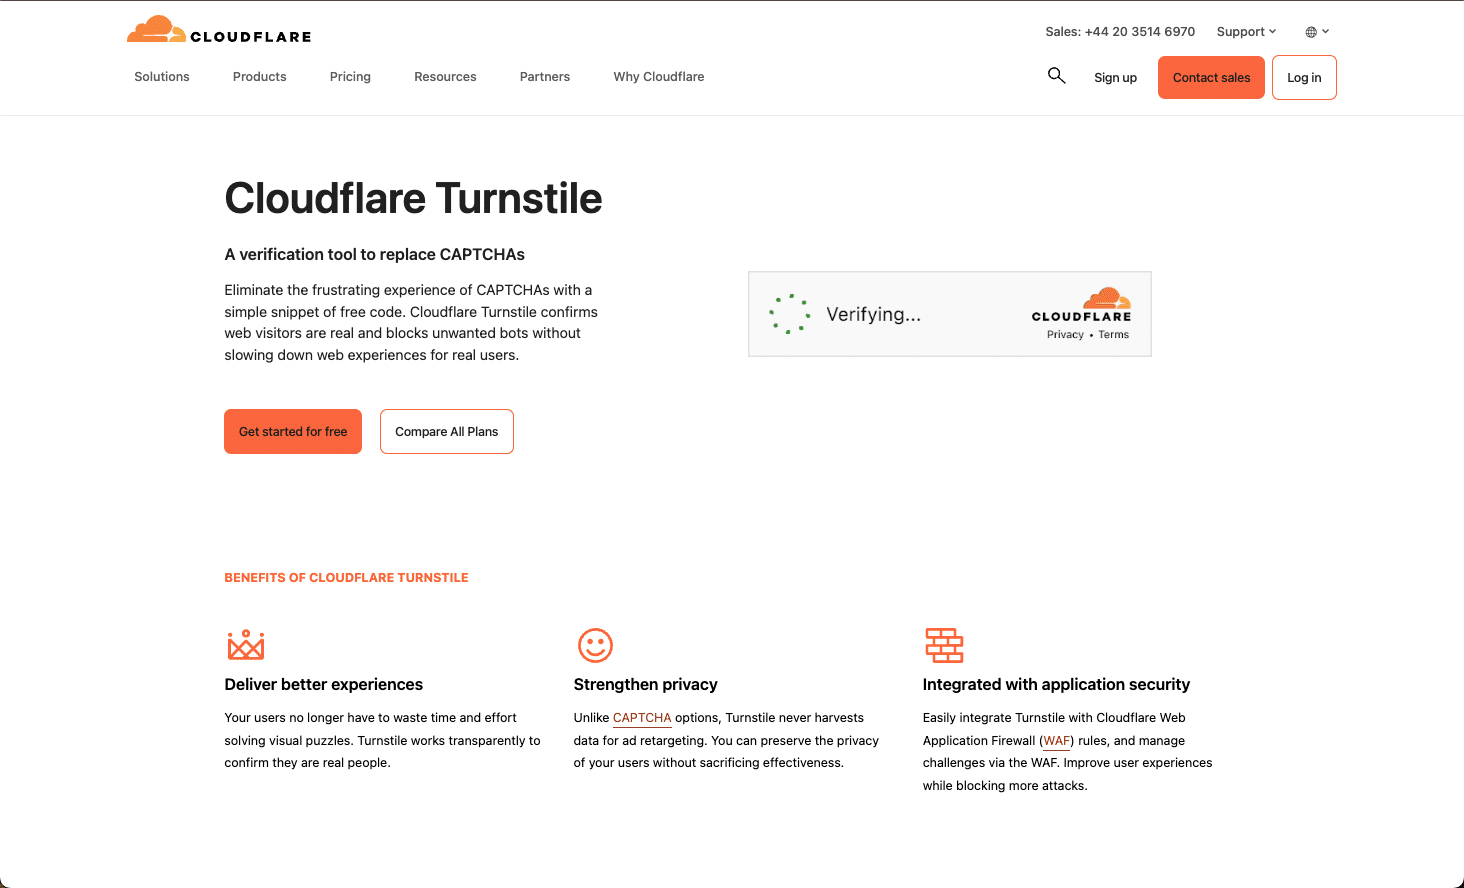
Cloudflare Turnstile is a privacy-friendly alternative to Google reCAPTCHA. It automatically verifies users without requiring them to solve puzzles, making the checkout process smoother.
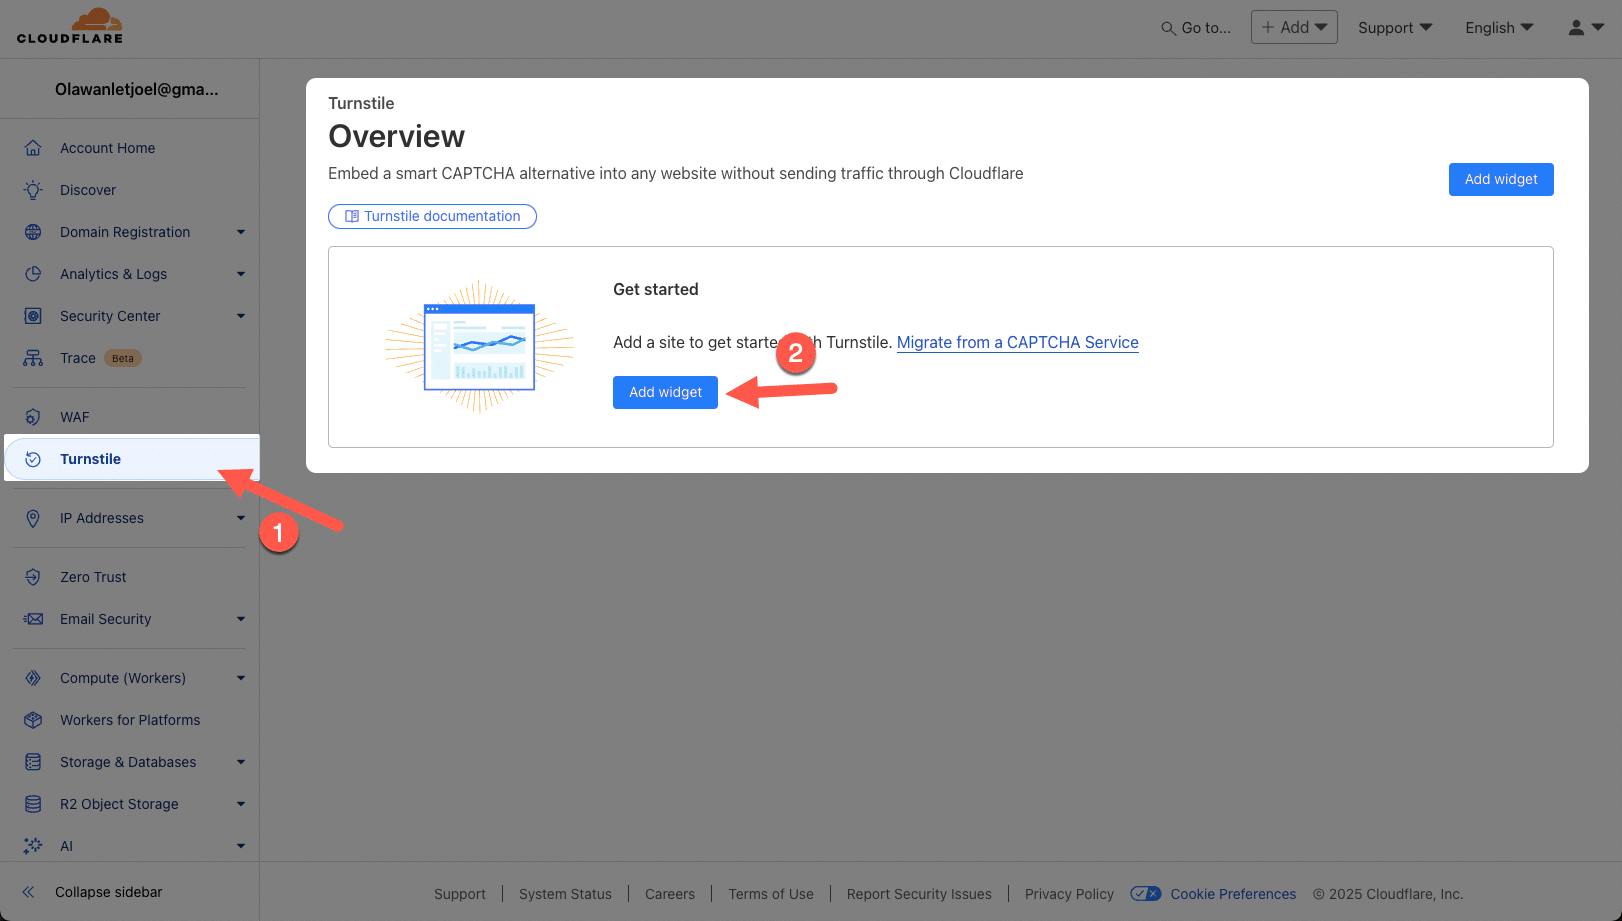
To use Cloudflare Turnstile in your WordPress site, navigate to the Cloudflare website and sign up or log in. Once you’ve done this, you’ll be taken to your Cloudflare dashboard. On your dashboard, look for Turnstile. If this is your first time using it, click on the Add Widget button.
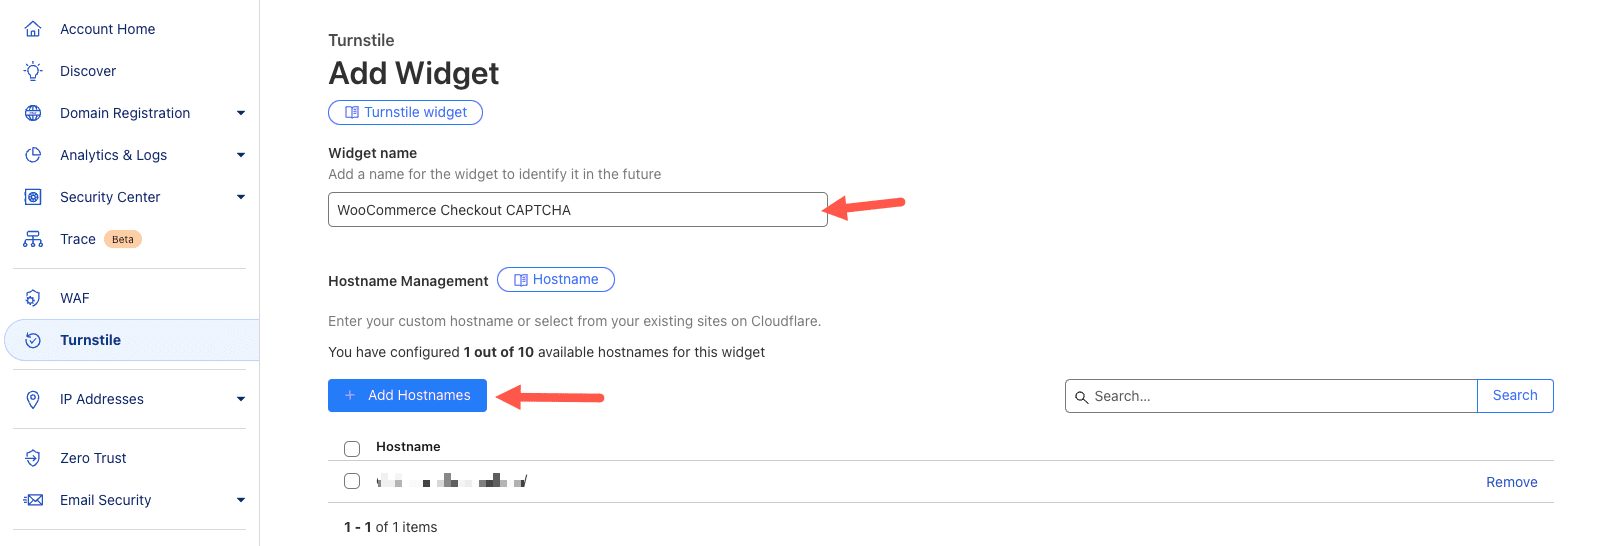
Next, name your widget (e.g., WooCommerce Checkout CAPTCHA) so you can identify it later. After that, click on Add Hostnames to add your website.
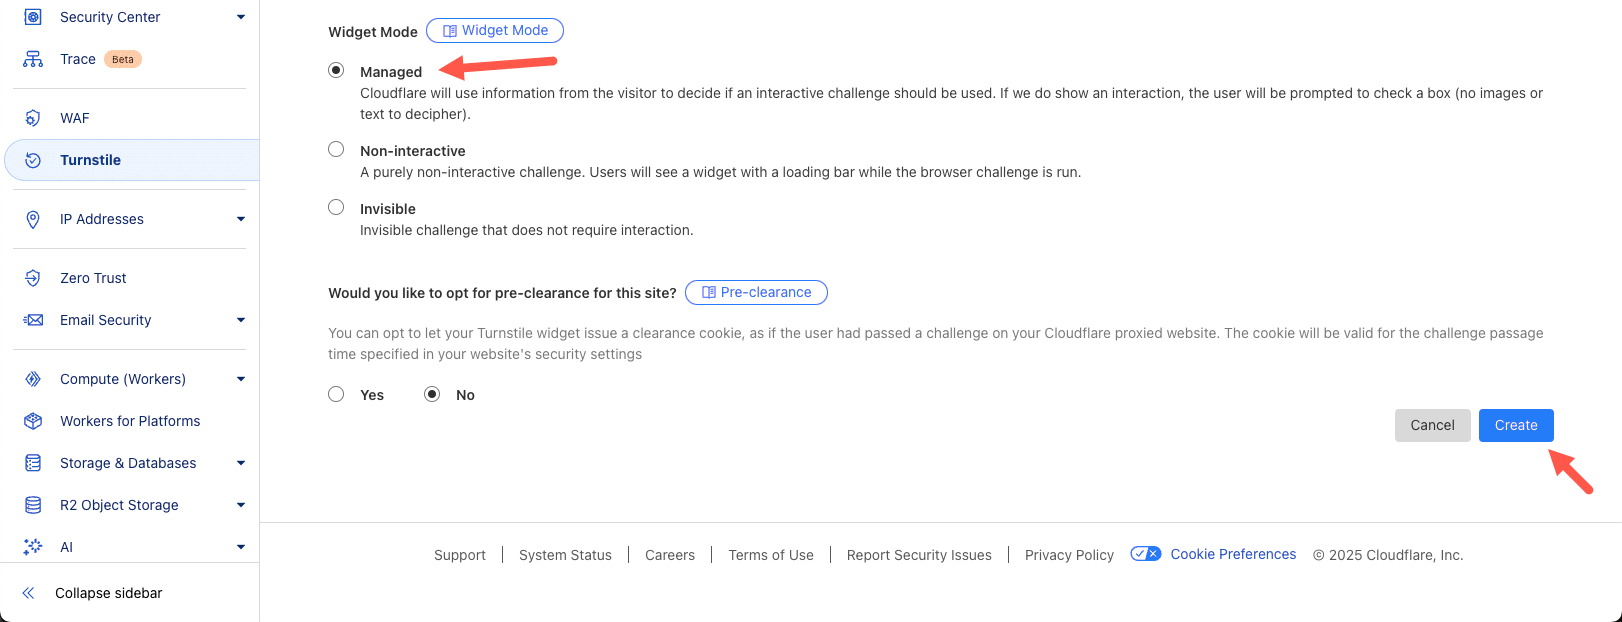
Now scroll down to select the Managed Widget Mode, then click on Create.
Once the widget is created, Cloudflare will generate API keys, which you will need in your WordPress dashboard. Copy both the Site Key and Secret Key from this page.
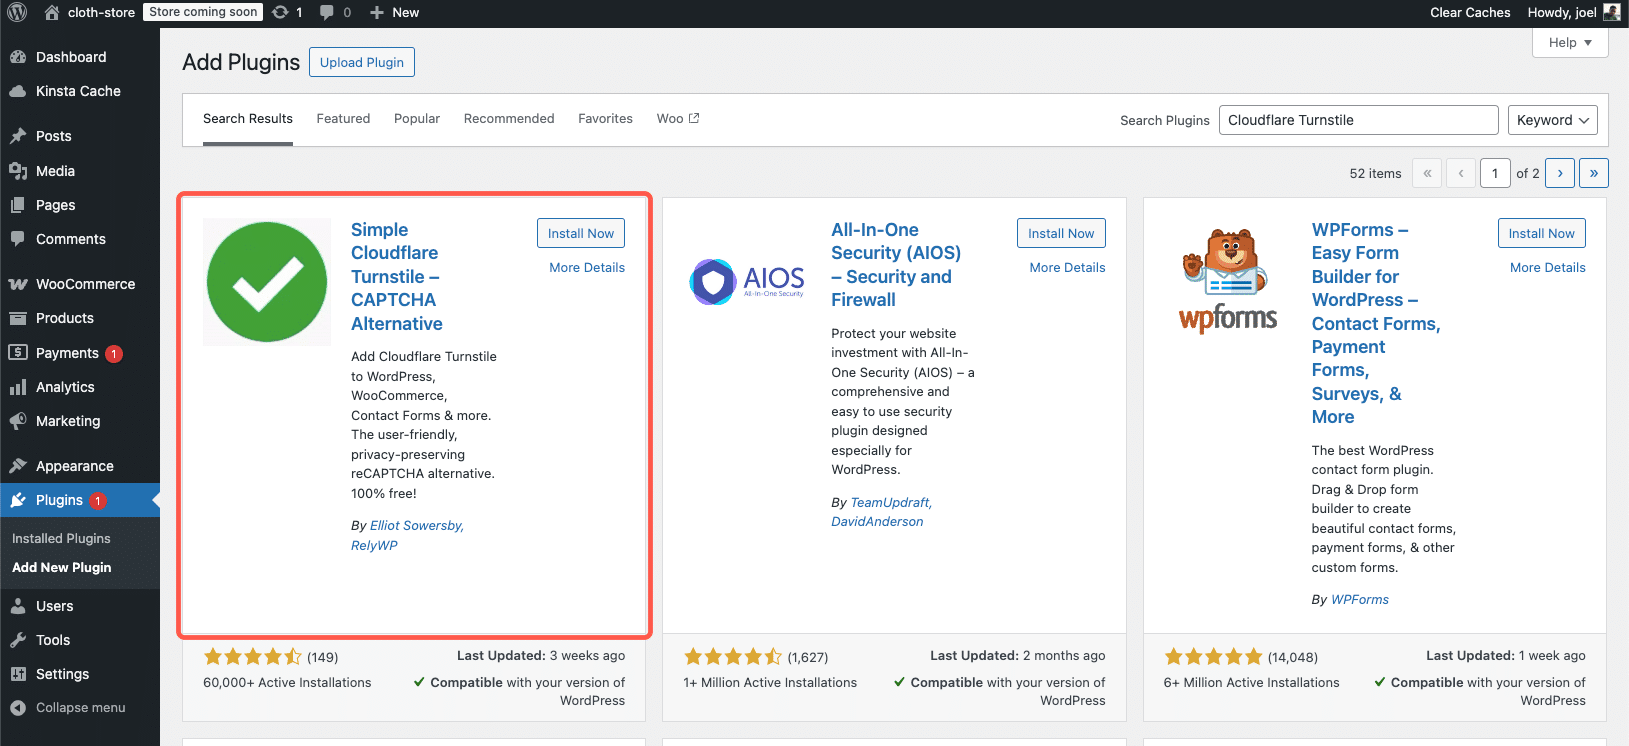
There are several plugins for adding Turnstile CAPTCHA to WordPress, but Simple Cloudflare Turnstile is a free and highly recommended option.
To use it, go to Plugins > Add New Plugin. In the search bar, type Simple Cloudflare Turnstile. Then, install and activate the plugin.
After activating the plugin, go to Settings > Cloudflare Turnstile. Paste the Site Key and Secret Key you copied earlier into the respective fields.
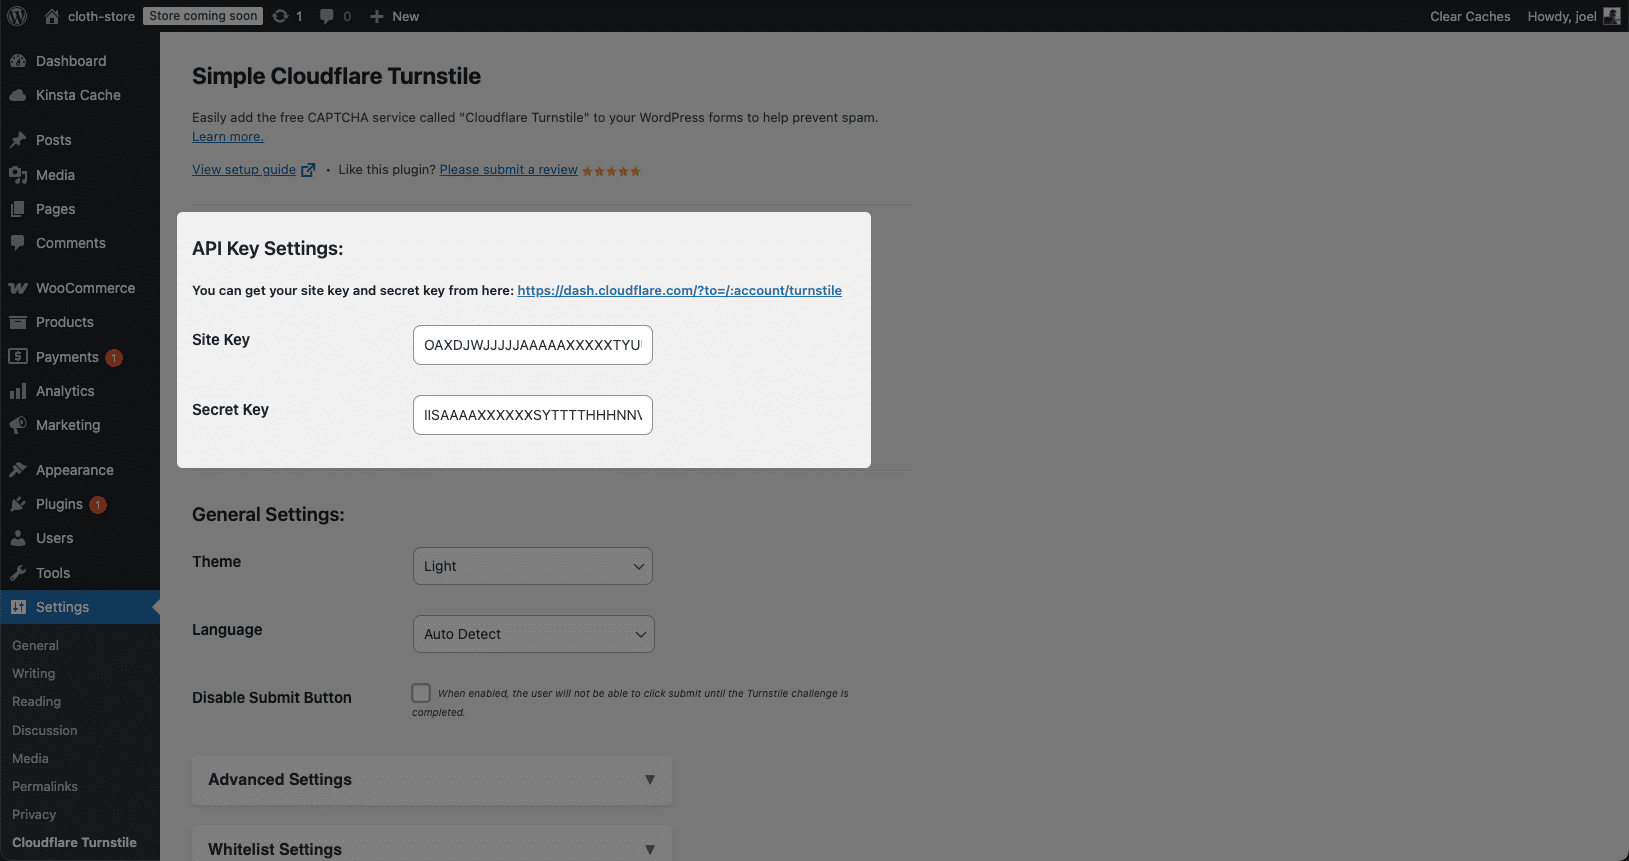
Now scroll down and check the forms where you want to enable Turnstile CAPTCHA. As shown below, select WooCommerce Login, Registration, and Checkout.
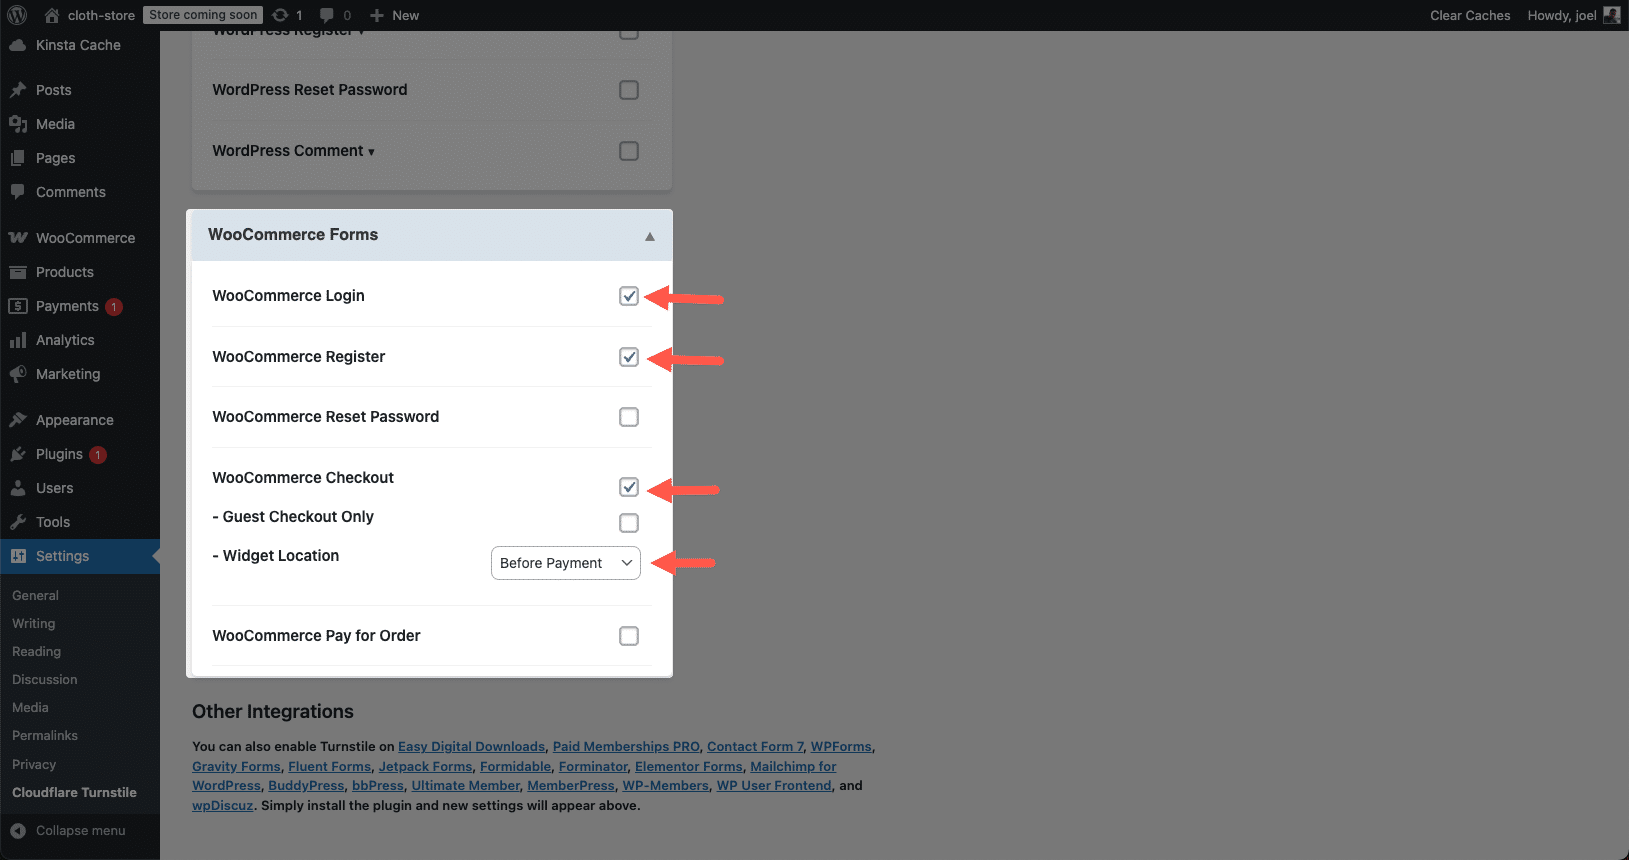
Click Save Changes, and you’re done. Open your WooCommerce checkout page, and you’ll notice the CAPTCHA challenge appears.
Option 2: Using advanced Google reCAPTCHA

Google reCAPTCHA is one of the most widely used spam protection tools. It offers reCAPTCHA v2 (checkbox verification) and reCAPTCHA v3 (background verification).
To begin using Google reCAPTCHA, sign into your Google account. Once logged in, navigate to the reCAPTCHA Products page and click Get Started. This will take you to the admin area, where you can register a new site by clicking + Create. Enter a label to identify the CAPTCHA, then choose a challenge type. For this guide, select reCAPTCHA v2 and choose the “I’m not a robot” Checkbox option.
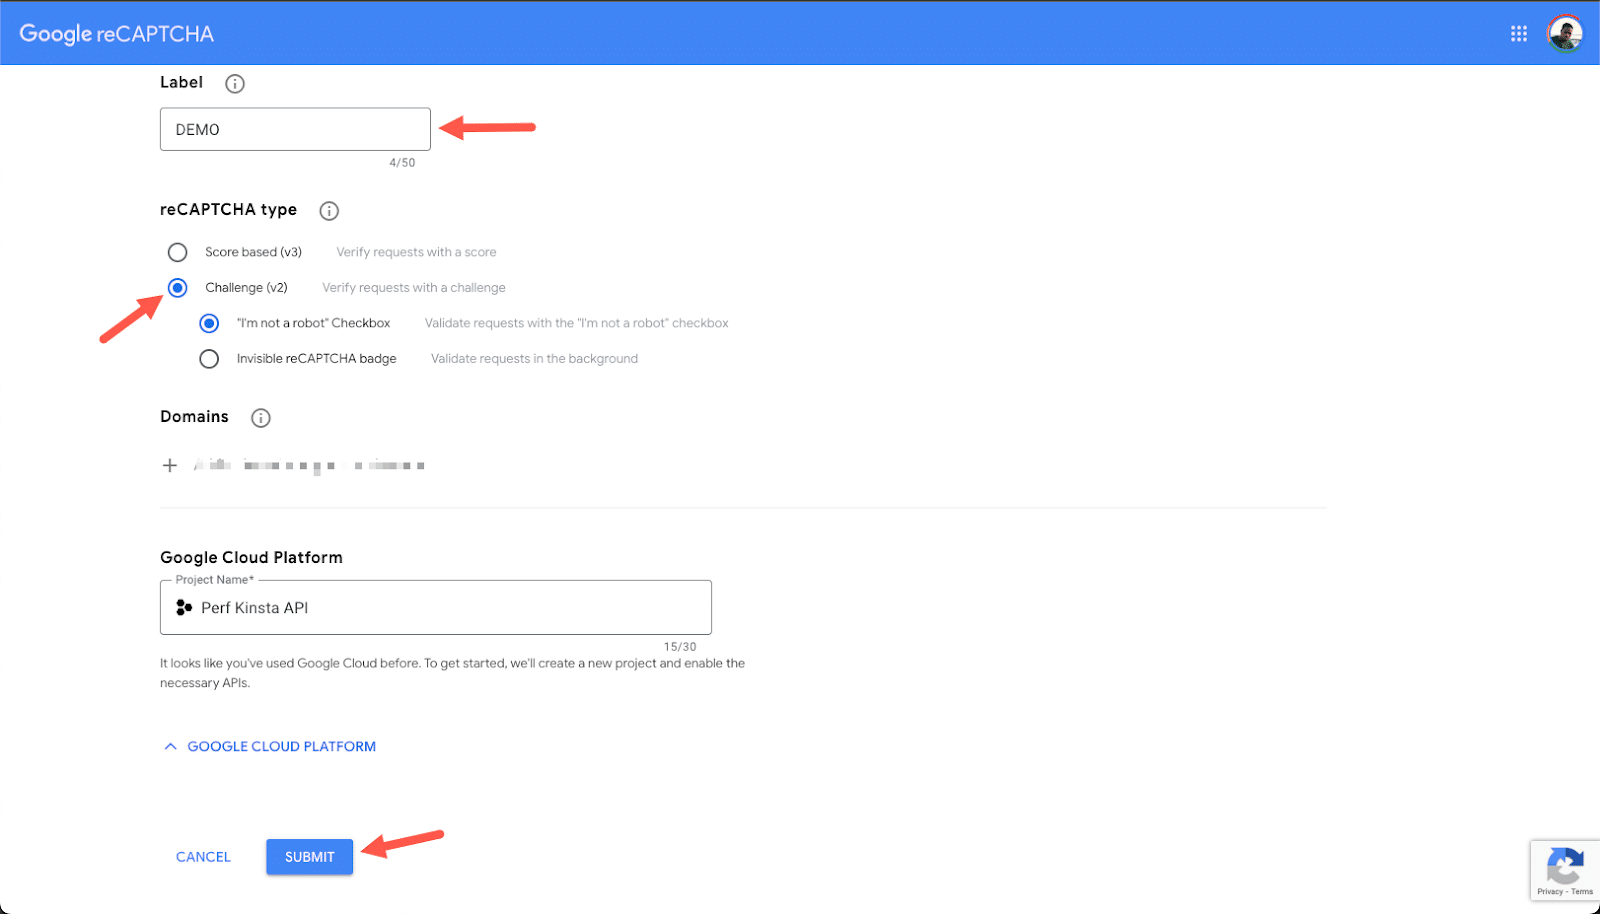
After selecting the challenge type, add your site’s domain without any prefixes (like example.com). Then, click Submit and copy the Site Key and Secret Key generated for you.
Next, return to your WordPress dashboard. Go to Plugins > Add New, search for Advanced Google reCAPTCHA, then click Install Now and Activate.

Once activated, navigate to Settings > Advanced Google reCAPTCHA. Select the Captcha and paste the Site Key and Secret Key from Google into their respective fields.
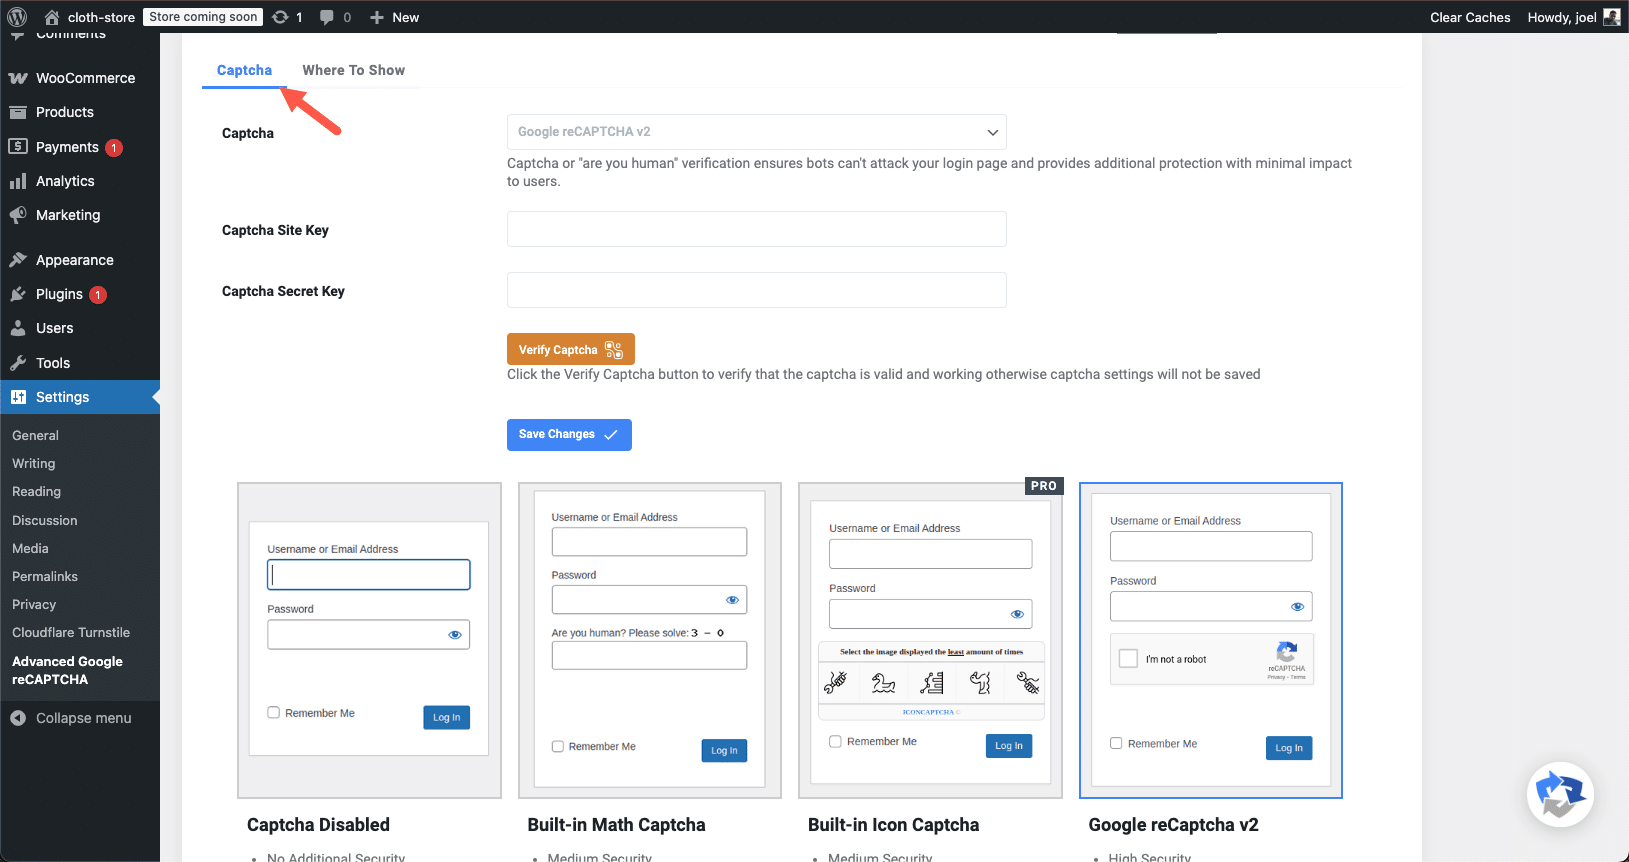
Also, choose how you want the CAPTCHA to appear, then switch to the Where To Show tab. Here, enable reCAPTCHA on forms and check both WooCommerce Checkout and WooCommerce Registration. Finally, click Save Changes to apply the settings.
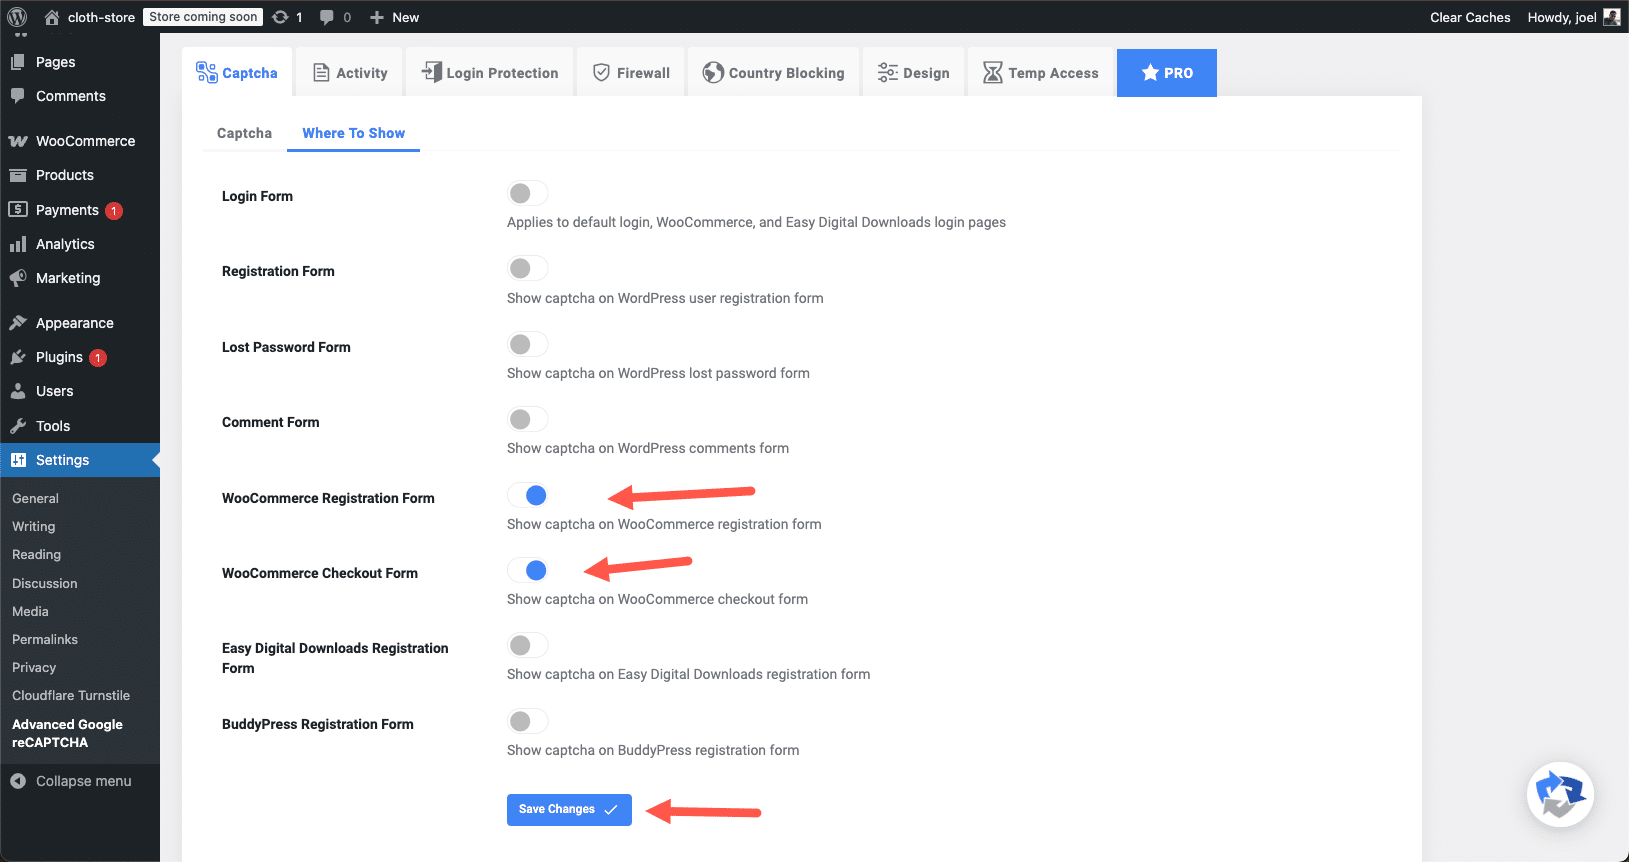
With this setup complete, open your store’s checkout page to verify that the CAPTCHA is working. If everything is configured correctly, the I’m not a robot checkbox should now appear where required.
3. Use anti-spam plugins
While CAPTCHA helps prevent bots from submitting spam orders, it’s not always enough, especially when dealing with more sophisticated spam tactics. This is why you need anti-spam plugins. These plugins work by automatically filtering out spammy emails, blocking suspicious IP addresses, and detecting fraudulent order patterns before they reach your WooCommerce database.
WooCommerce doesn’t include built-in anti-spam protection for orders, so using a dedicated plugin can significantly reduce spam without adding friction for real customers.
Several effective anti-spam plugins are available, but two of the best options for WooCommerce stores are CleanTalk Spam Protect and Akismet. Let’s go through how to install and configure CleanTalk, which is specifically designed for WooCommerce order spam prevention.
How to set up CleanTalk Spam Protect for WooCommerce
CleanTalk is a premium anti-spam service that filters spam orders, blocks fake accounts, and prevents bot registrations — all without requiring CAPTCHA. It works silently in the background, checking orders and form submissions against its global spam database.
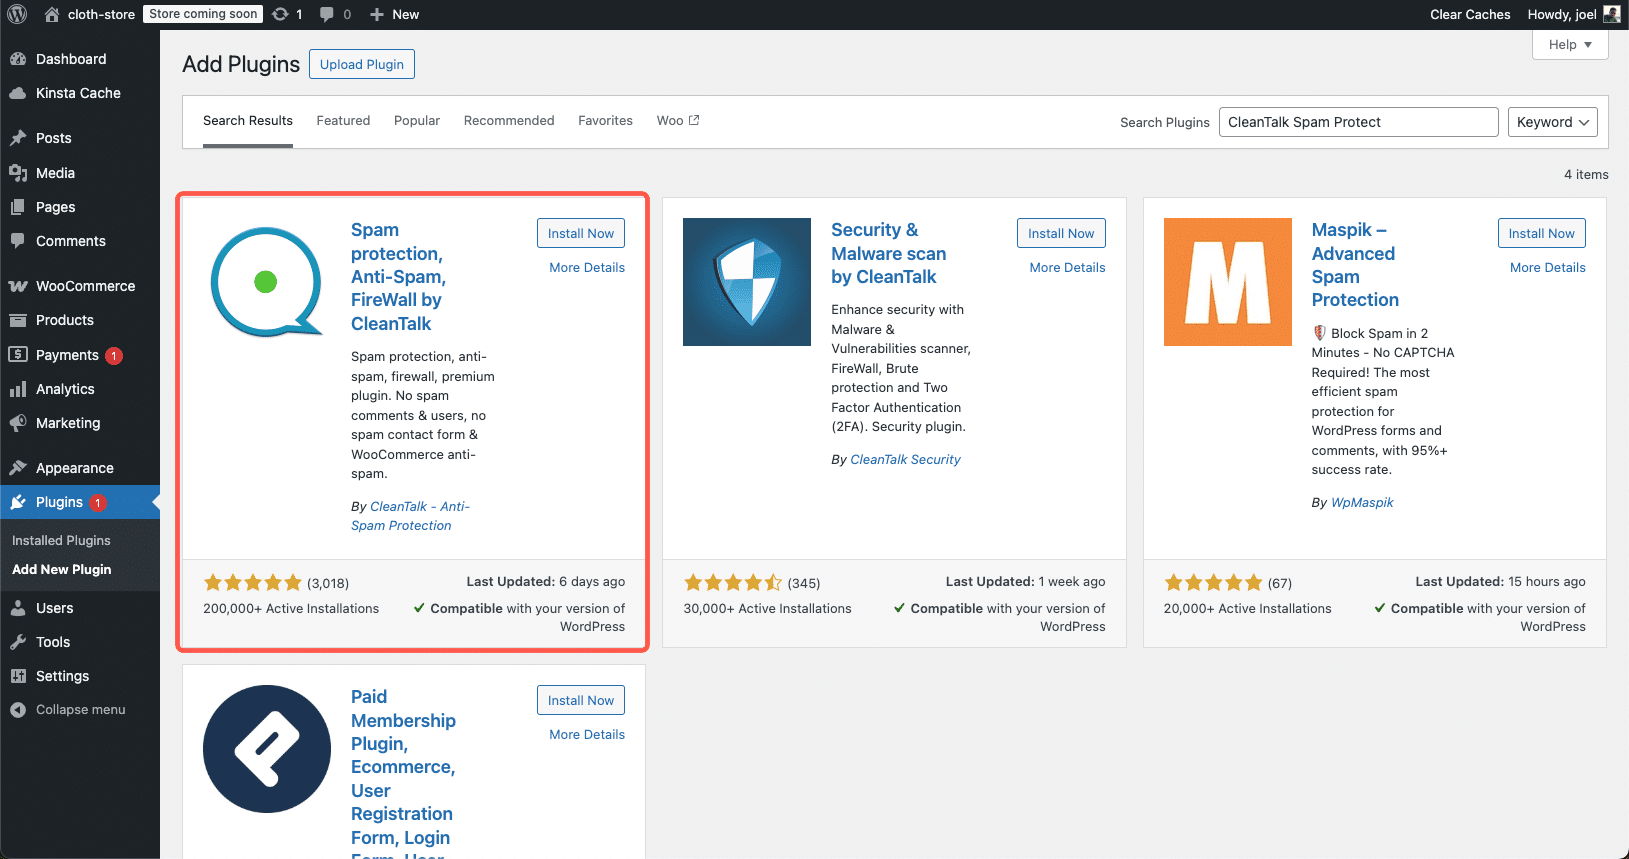
To get started, go to your WordPress dashboard and navigate to Plugins > Add New. In the search bar, type CleanTalk Spam Protect. Once you find it, click Install Now, then Activate.
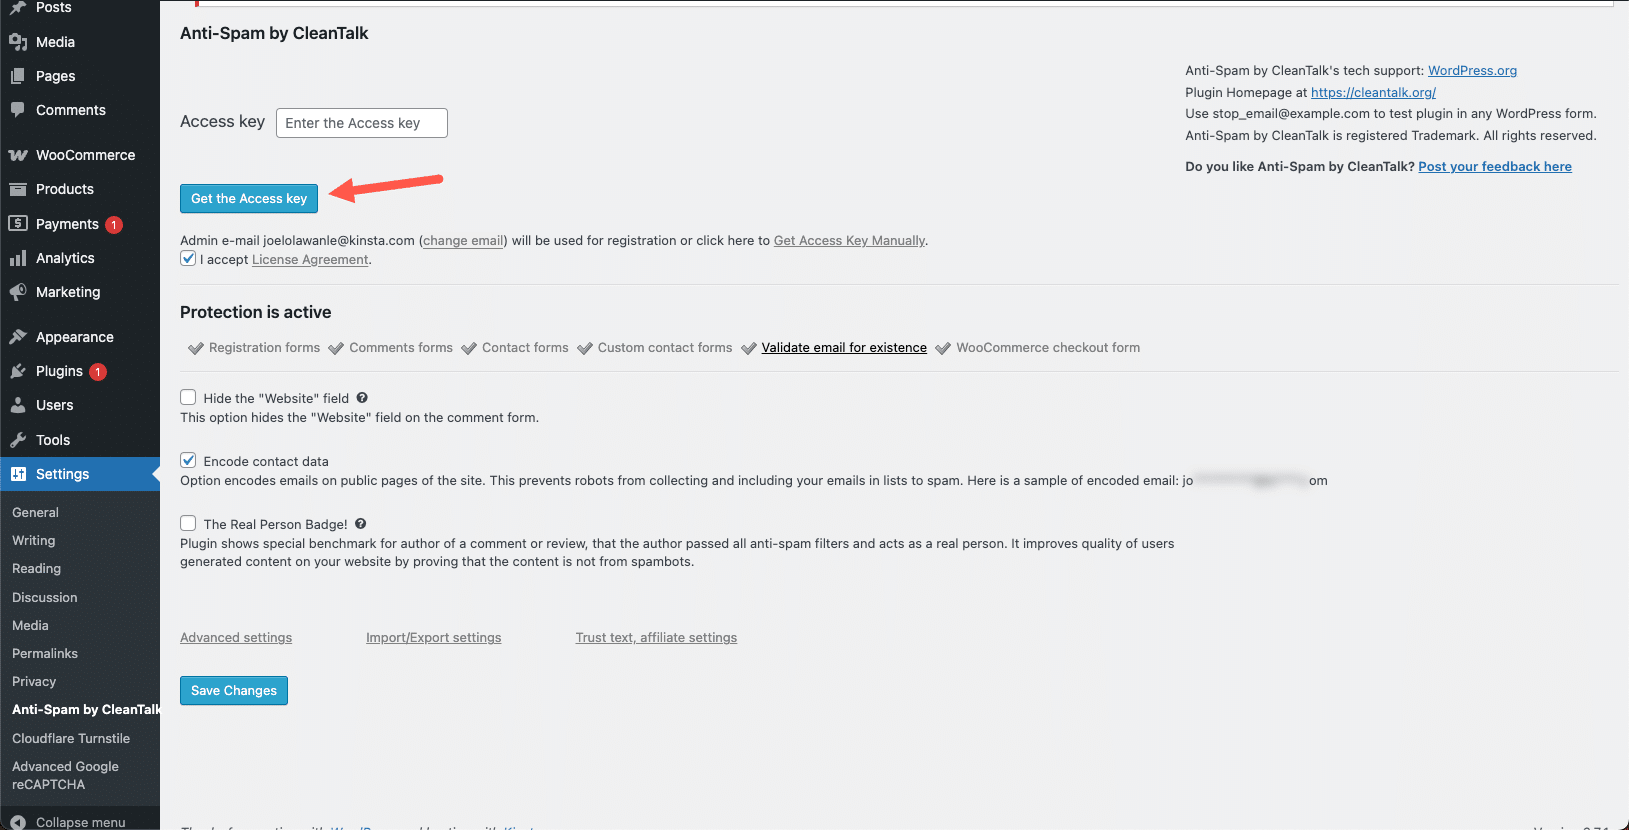
After activation, go to Settings > Anti-Spam by CleanTalk. You’ll be prompted to enter an Access Key. Since CleanTalk is a paid service, you’ll need to create an account on the CleanTalk website and sign up for a subscription.
After registering, CleanTalk will provide you with an Access Key, which you should copy and paste into the plugin settings.
Once you’ve entered the key, you can confirm if this will work for your WooCommerce checkout forms by clicking the Advanced settings link and scrolling down to the WooCommerce section.
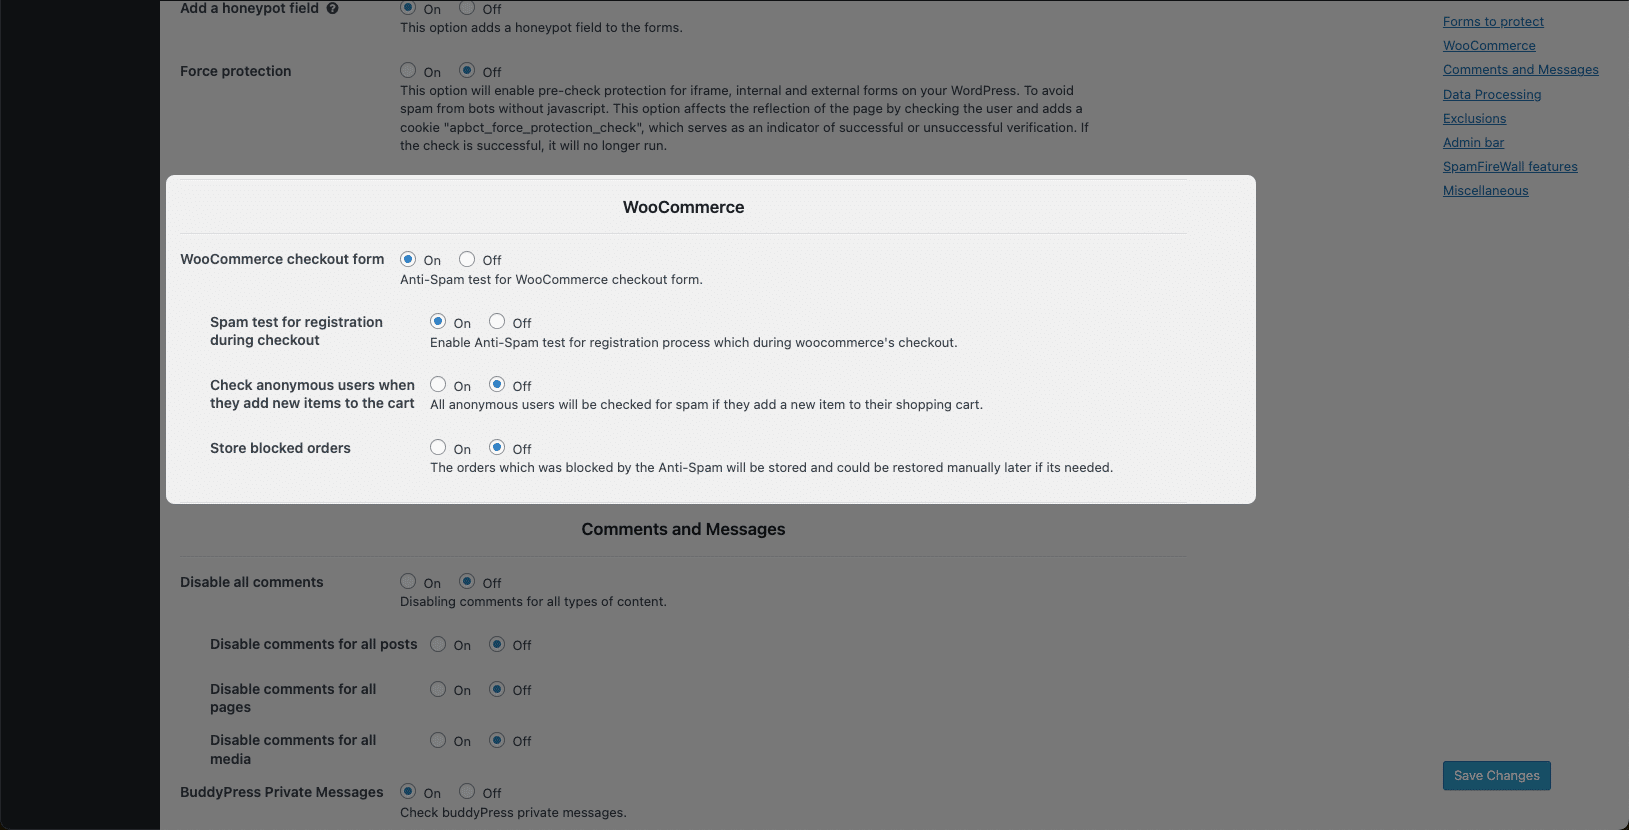
Once you’ve enabled these settings, click Save Changes. Your WooCommerce store is now protected against spam orders and fake registrations.
4. Disable Guest Checkout
One cause of WooCommerce spam orders is that guest checkout is enabled by default.
Allowing customers to place orders without creating an account speeds up the checkout process, but it also allows bots and fraudsters to submit fake orders without restriction.
Disabling guest checkout forces customers to create an account before placing an order. This simple step adds a layer of security because bots often struggle with completing the additional fields required for registration, especially when combined with CAPTCHA or email verification.
However, before disabling guest checkout, consider how it might impact your sales. Some customers prefer a frictionless shopping experience and might abandon their cart if forced to create an account. If your store has many one-time buyers, you might want to explore other security measures before fully turning off guest checkout.
To disable guest checkout, go to your WordPress dashboard and navigate to WooCommerce > Settings. In the settings menu, click on the Accounts & Privacy tab.
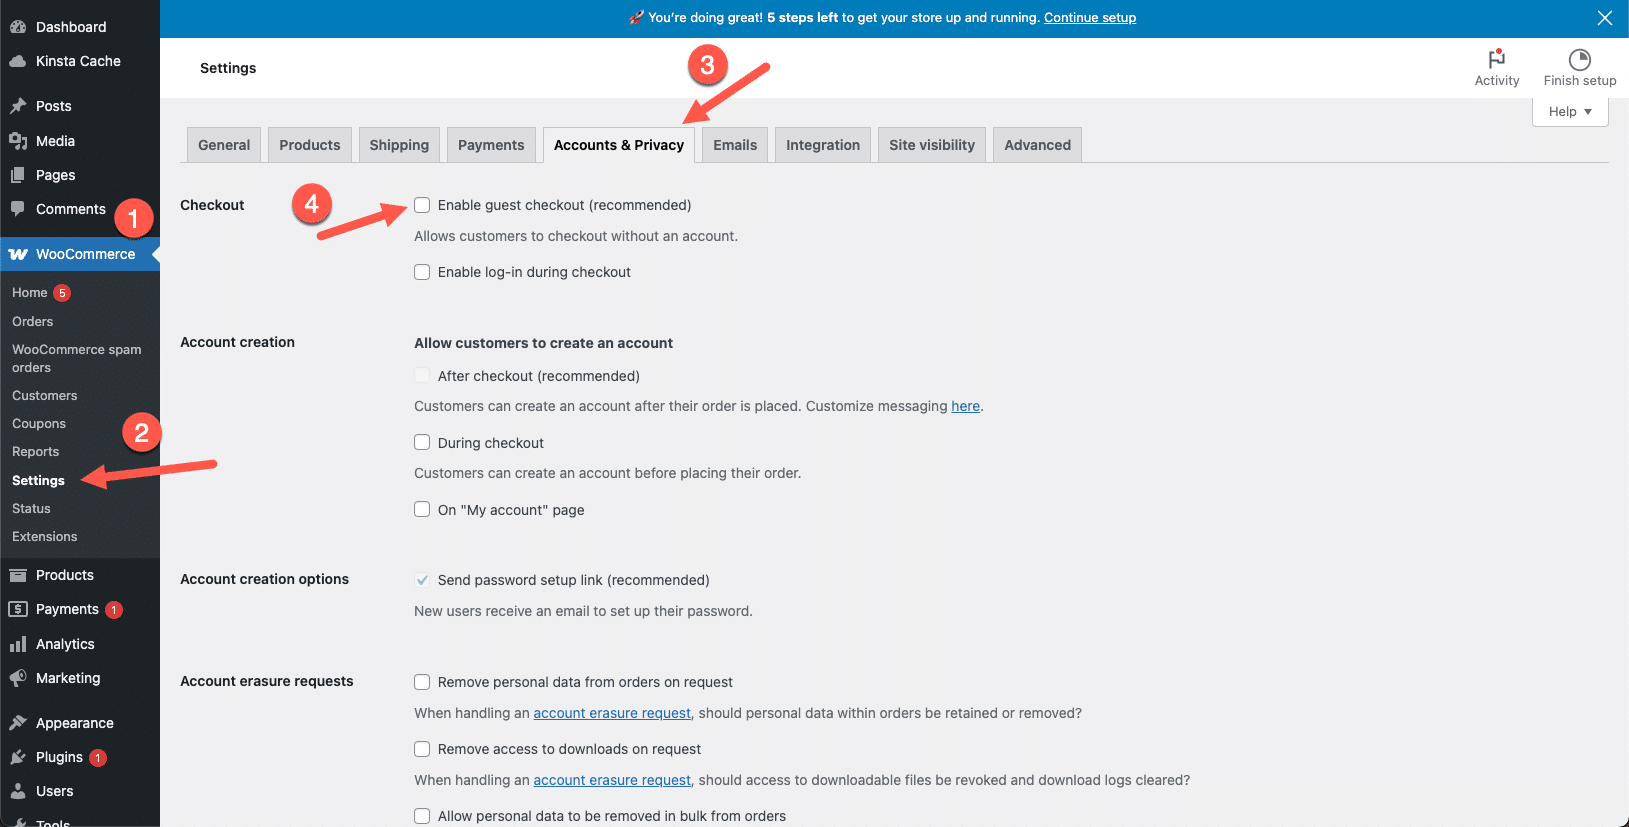
Once done, scroll down and click Save Changes.
Once guest checkout is disabled, customers will no longer be able to check out as guests. Instead, they will be prompted to either log in to an existing account or create a new one before completing their purchase.
5. Use anti-fraud plugins
Even with CAPTCHA and anti-spam measures, some fraudulent transactions can still pass through. This is especially common with scammers using stolen credit cards, fake customer details, or mass-generated orders to exploit WooCommerce stores.
To combat this, anti-fraud plugins add an extra layer of security by blocking suspicious transactions before they are completed.
These plugins analyze various risk factors, such as IP addresses, email domains, billing details, and unusual order behaviors, to detect potential fraud. If an order is flagged as high risk, the plugin can automatically block it, hold it for manual review, or notify the store admin.
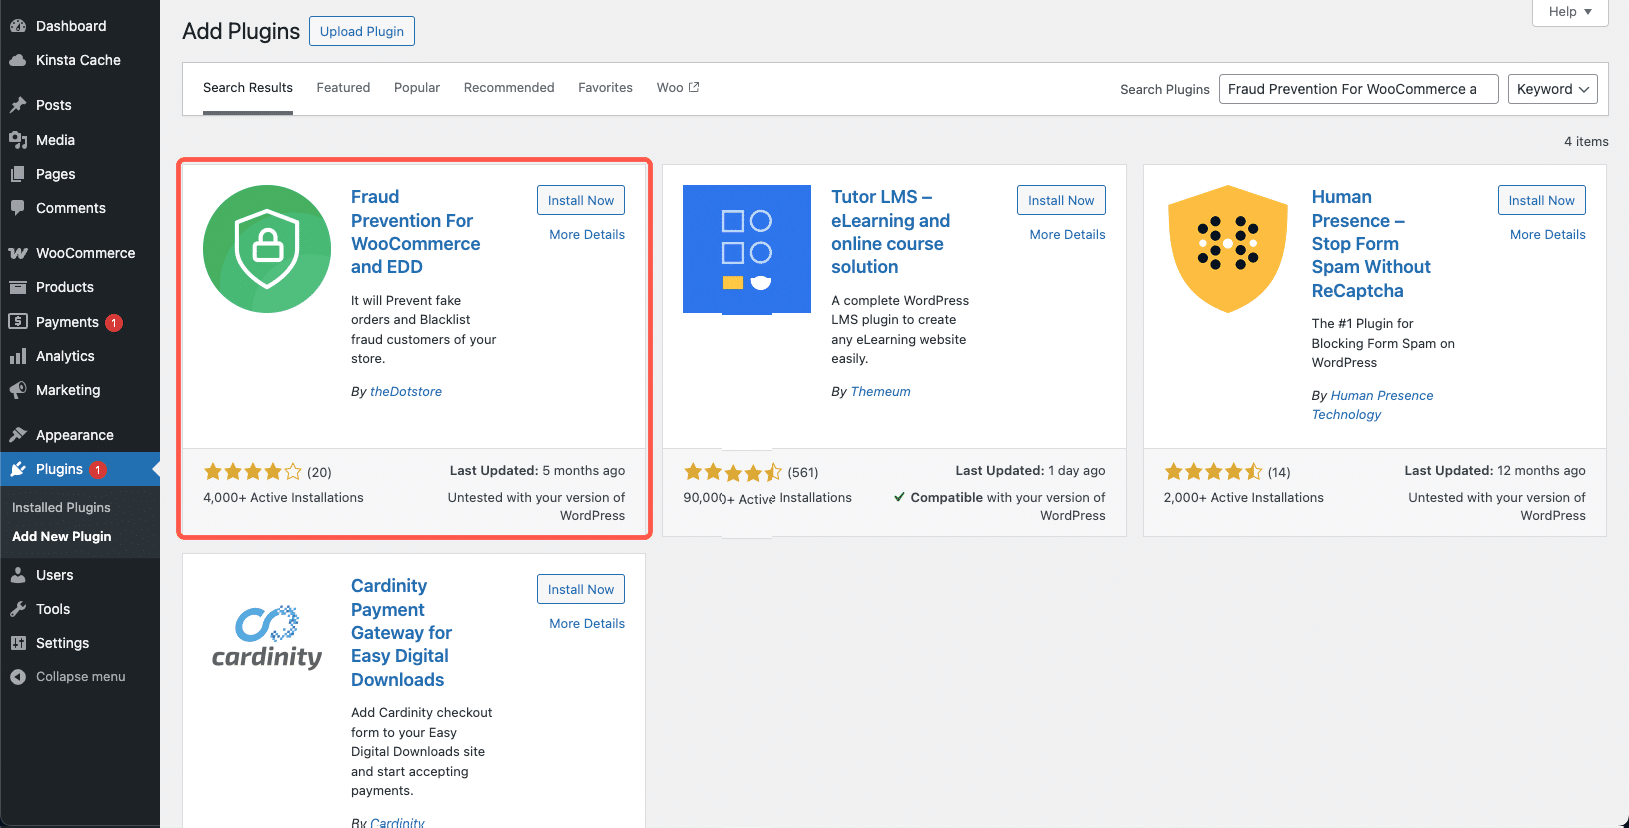
One of the best options available for WooCommerce is Fraud Prevention For WooCommerce and EDD (formerly Woo Blocker Lite). Let’s go over how to set it up.
How to set up Fraud Prevention For WooCommerce
Fraud Prevention For WooCommerce and EDD is a lightweight yet powerful anti-fraud plugin designed to prevent fake orders and spam transactions. It allows store owners to create custom fraud prevention rules, view blacklisted user details, and generate fraud reports — all without affecting real customers.
To install it, go to your WordPress dashboard, navigate to Plugins > Add New, and search for Fraud Prevention For WooCommerce and EDD. Once you find it, click Install Now, then Activate.
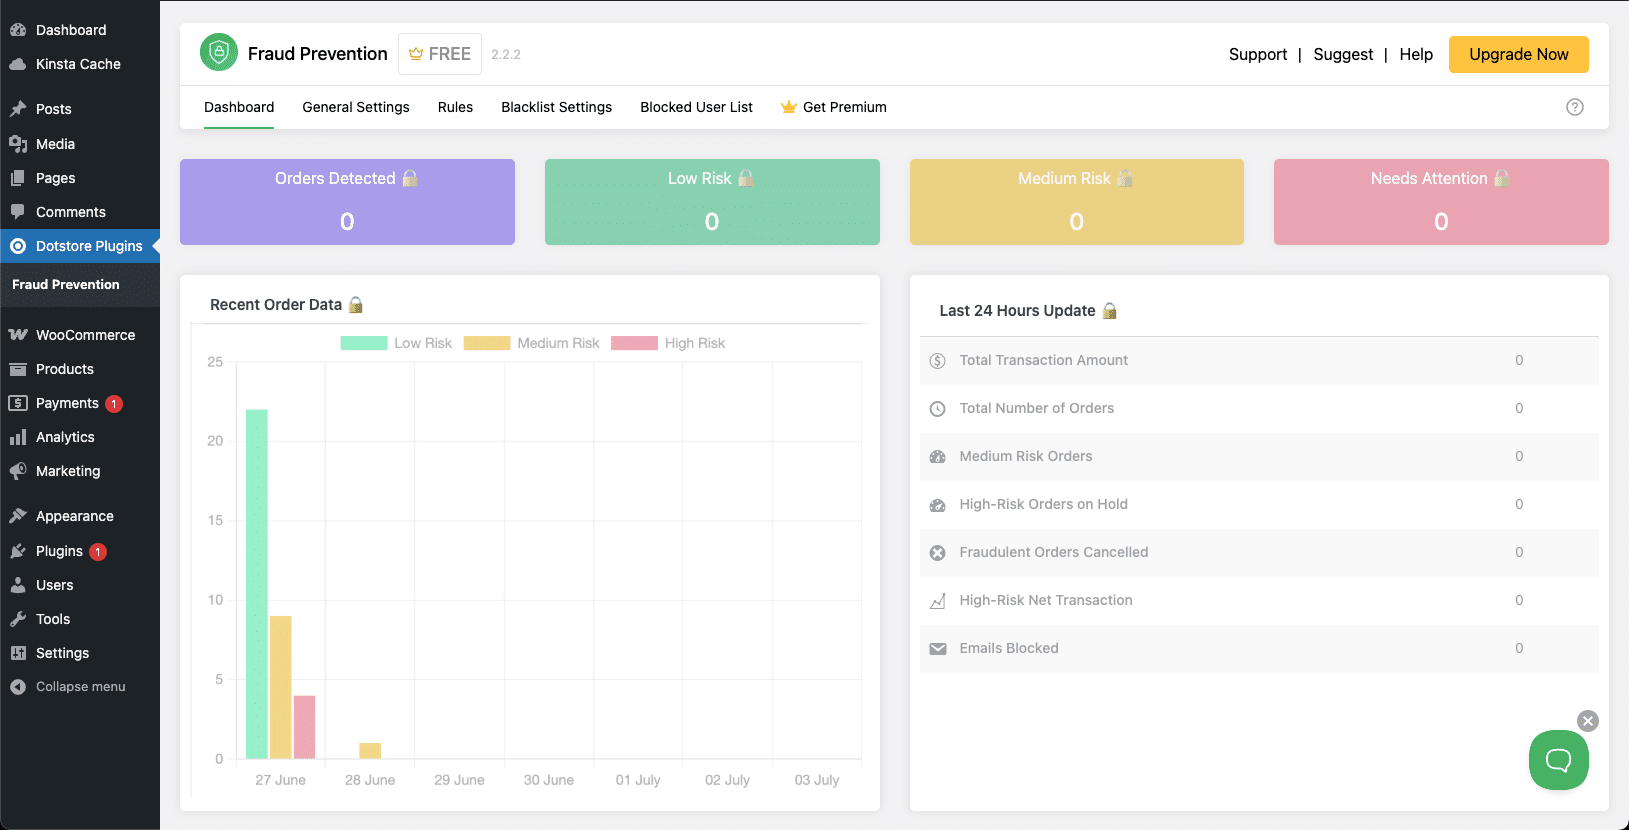
After activation, you will be presented with a demo video explaining what the plugin can do. You can access the Fraud Prevention settings page in Dotstore Plugins > Fraud Prevention. This is where you’ll configure the fraud detection settings for your store.
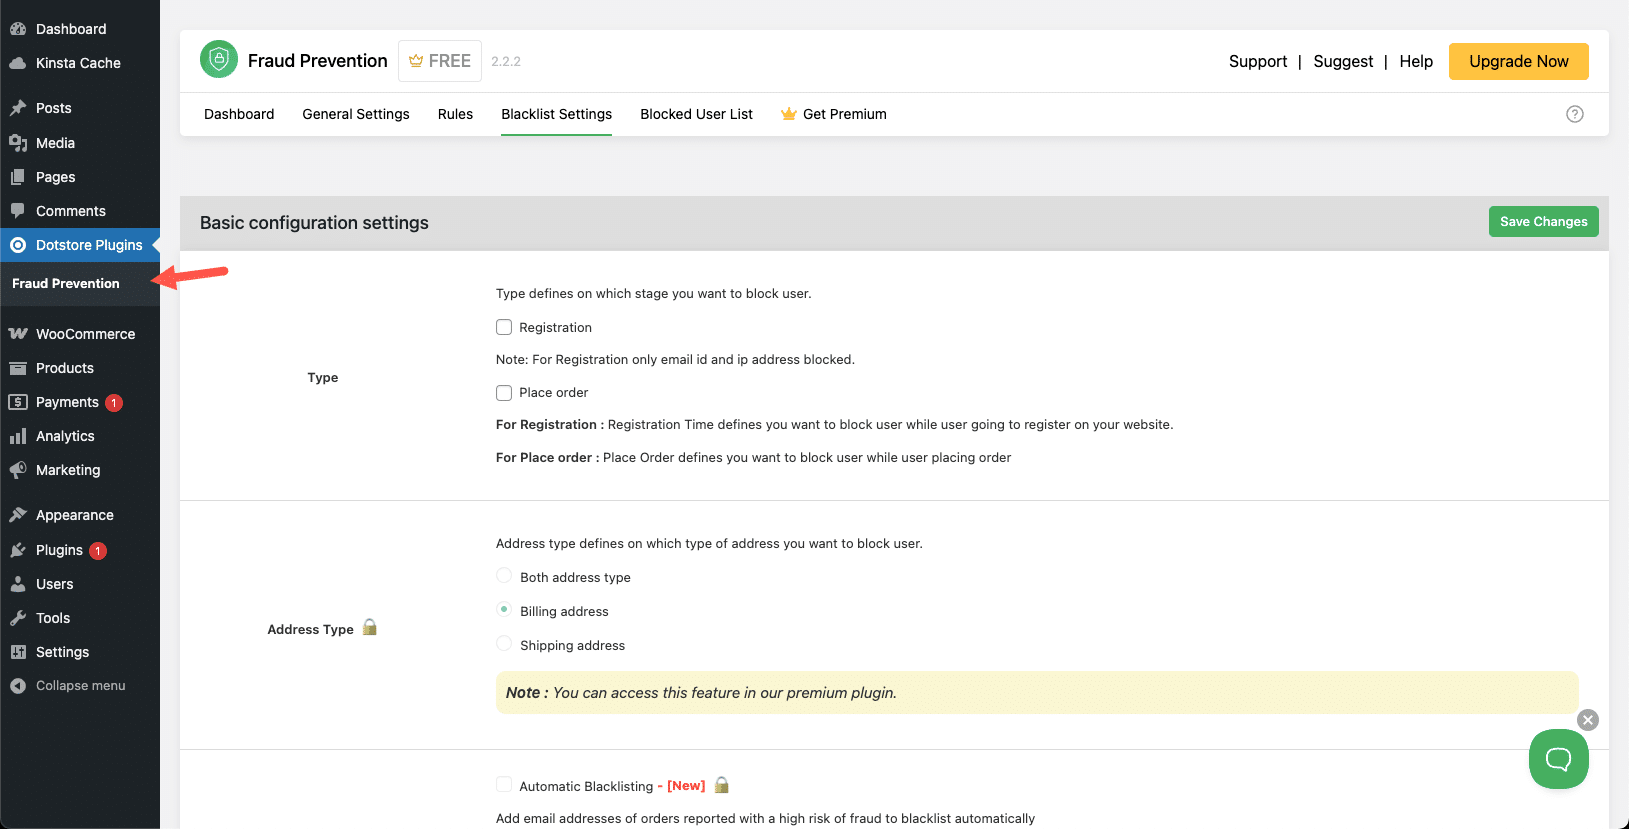
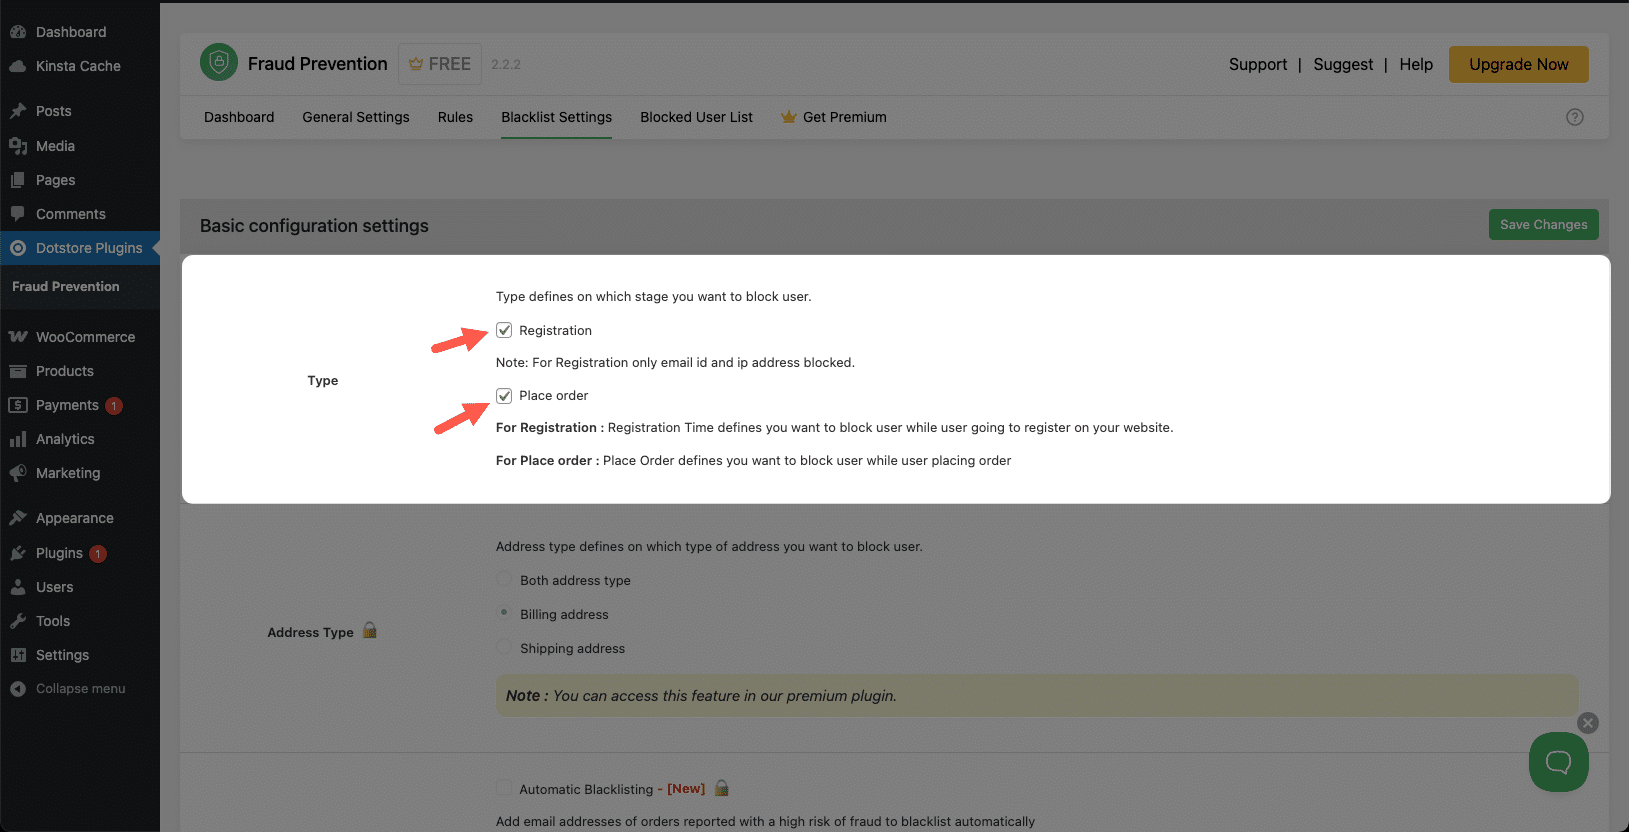
Decide whether you want to block fraudulent users during registration, checkout, or both by selecting the appropriate options in the Blacklist Settings section. Check the boxes based on when you want the plugin to detect and prevent fraudulent activity.
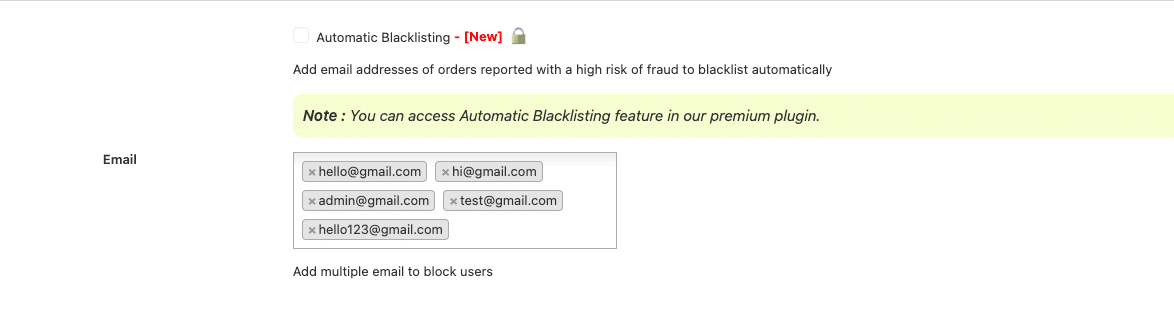
You can also manually blacklist specific users based on their email address, IP address, state, or ZIP code. If you have noticed repeat fraud attempts from a particular source, adding them to the blacklist will prevent future spam orders from being placed.
Additionally, the plugin provides a detailed fraud report that allows you to monitor suspicious activity and track blocked orders. This helps store owners quickly identify patterns in fraudulent transactions and take proactive steps to secure their WooCommerce site.
Once you’ve configured the necessary settings, click Save Changes. Your store is now protected against common fraud tactics and spam orders.
Summary
WooCommerce order spam can be a serious issue, but with the right security measures, you can keep your store safe.
At Kinsta, our 24/7/365 security team, three-minute malware scans, and enterprise-grade Cloudflare protection help block spam and fraudulent activity before it reaches your store. Our high-performance WooCommerce hosting can boost your store’s speed by up to 200%, ensuring smooth and secure transactions.
If your current host isn’t cutting it, check out Kinsta’s WooCommerce hosting for faster speeds and better security.
The post 5 ways to prevent spam orders in WooCommerce appeared first on Kinsta®.

Comments
No comments yet. Be the first to comment!